Not so long ago, Microsoft allowed owners of Xbox One controllers to change the button assignments on Windows 10 computers. Previously, this option was only available to owners of Xbox One Elite Controller controllers, as well as on the Xbox One consoles themselves. Those with a regular Xbox One controller had to settle for the traditional control scheme. For the vast majority of players, this will not cause any inconvenience, but a separate category of users will be unhappy that they do not have the ability to invert sticks, for example, or change button assignments. Enough tolerating this. You can now change settings for regular Xbox One controllers in Windows 10. This guide will tell you how to do it.
How to update your Xbox One controller firmware
We live in a time when it is necessary to update the firmware even for gamepads. Before you start personalizing your controller, make sure it has the latest available firmware. To do this, go to the Microsoft Store app store and download the app Accessories Xbox. It is from it that the firmware is updated and the buttons are remapped.
Install the application on your PC and run. After that, connect the gamepad by wire to your PC and wait for the firmware update to complete. If the firmware update does not start automatically, click the button Extra options, and then Firmware version.

How to remap buttons on an Xbox One controller
When you have the latest version of the gamepad firmware installed, you can start customizing the buttons (remapping). Please note that you only have access to basic settings for the main controls. Deep customization, profiling, calibrating trigger deadzone, stick stiffness, paddle customization, and more are all perks of owning an Xbox Elite controller. And yes, you can customize only Xbox One gamepads. For Xbox 360 and other controllers, you will have to use third-party software. In addition, you cannot assign keyboard buttons to the gamepad. If you need such an opportunity, use third-party utilities.
To change the configuration of the controller buttons, it is best to use a wired connection. Theoretically, you can change the buttons on the gamepad when connected wirelessly, but in our case, the application says that the controller customization is only available on the Elite gamepad. When connected via wire, this message disappears and the application allows you to personalize the gamepad.
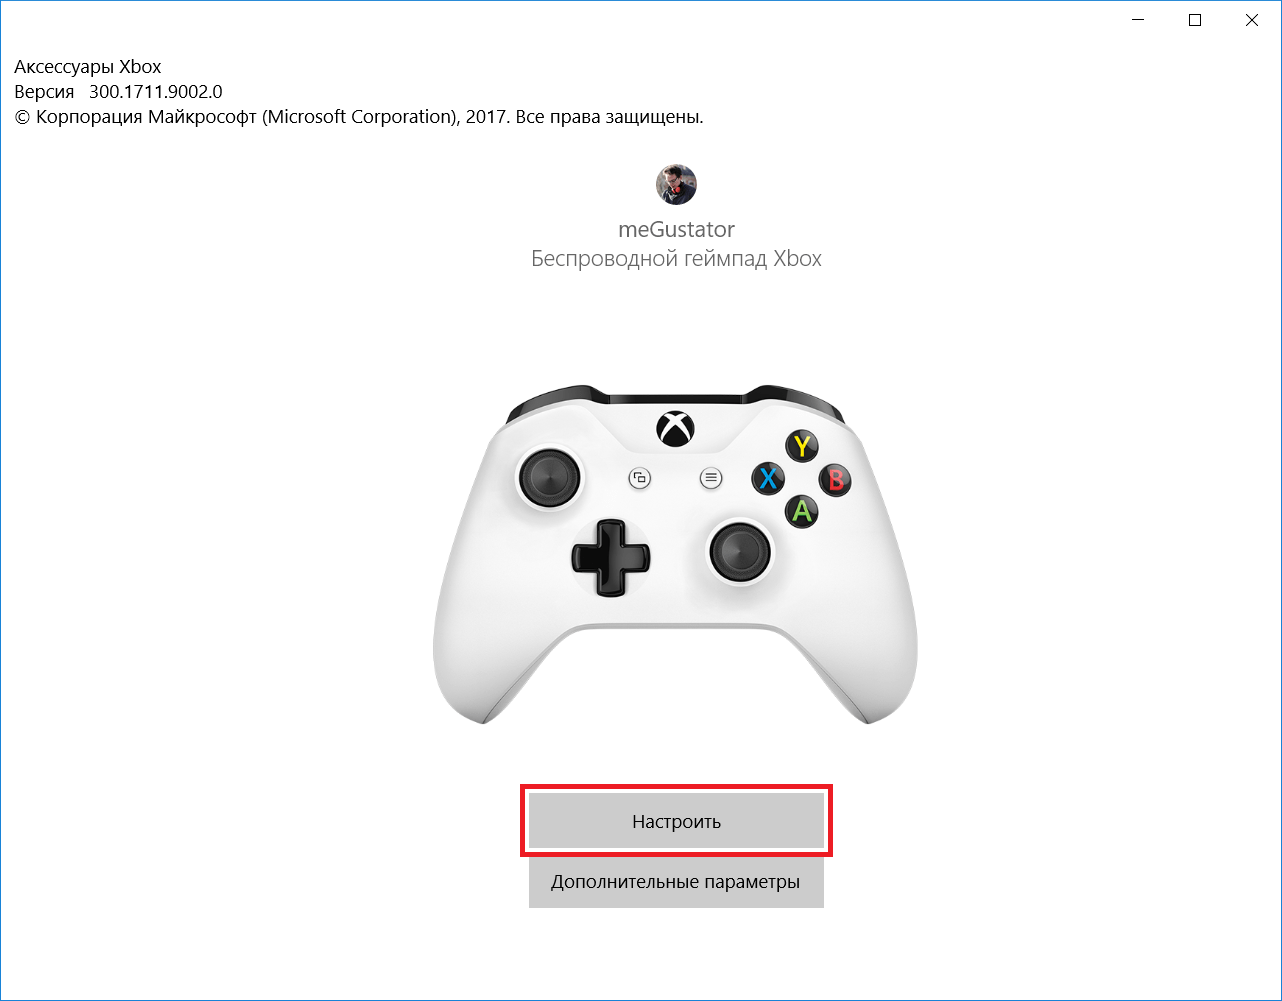
To the computer by wire, open the application Accessories Xbox, make sure that it is defined in the system and click Tune. The settings button can also be available when connected wirelessly (it's hard to see the dependency here).
Click the button Button Mapping(Oh, this divine localization). After that, you will be taken to the settings interface of your gamepad. The application cannot boast of an abundance of settings, like the Elite Gamepad, but you can still find a few convenient options here.

Now you can start changing the configuration of the gamepad. The following options are available:

How to turn off vibration on the Xbox One controller
Vibration significantly improves gameplay and allows you to immerse yourself in the gameplay through tactile feedback. Although the vast majority of players prefer to play with vibration turned on, there are those who do not need it or simply do not like it. Again, you can turn off the vibration of the gamepad in the game itself (if there is such an option), but to disable vibration globally, you can use the gamepad settings application.
Connect the controller to the computer and run the application Accessories Xbox.
Click on the button Tune. If you have connected a gamepad via Bluetooth and the application tells you that the setting is only available for Elite gamepads, connect the controller via wire (any microUSB cable) and restart the application.
Press Button Mapping, and then uncheck the box next to Turn on vibration. After that, the controller will turn off the vibration in all games. If you want to turn it back on, follow the same procedure and check the box next to Turn on vibration.

How to disable the Xbox One controller buttons
Yes, you can. If a button bothers you for some reason, you can disable it completely. This is done from the controller button settings interface. Connect the gamepad to the computer (best by wire), open the application Accessories Xbox, and then click Customize - Button Mapping.
From the first drop-down menu, select the button you want to disable. It can be one or more XYABs, bumpers, a D-pad, or buttons on sticks. Then, from the second drop-down menu, select Unmatched.

Once configured, the buttons you selected will no longer work. To return everything back, do all of the above, only in the second drop-down menu, select the button that you disabled. Alternatively, you can simply reset your gamepad, as described in the rest of this guide.
How to reset your Xbox One controller
If for some reason you need to reset your controller (for example, you want to reconfigure the controls), simply connect it to your computer in your preferred way, launch the application Accessories Xbox, click Tune, and then Restore original. All custom settings you have saved will be deleted.

We can say with confidence that various third-party utilities, which are full on the Internet, can configure your gamepad much more accurately and thoroughly. Still, for many users, the set of functions offered by the standard application will be enough.
Most modern games are designed for gamepad control.
This is a great opportunity to immerse yourself in the world of virtual reality. But the enjoyment of the game can be interrupted by possible control problems, for example, when it does not work or sticky button on xbox 360 joystick.
The most common controller problems are:
- Sticky: for example, after pressing the same key several times in a row, it sticks.
- Poor sensitivity: in order to execute a certain command, you need to press the button hard several times.
- Breakage of contacts, as a result of which the buttons work only once or do not execute commands at all.
Consider possible repair options.
If the buttons on the Xbox 360 controller are stuck - a simple solution
If the button on the joystick is stuck, it’s not worth taking it in for repair right away, because you can solve problems quickly and easily, and with your own hands using ordinary foil and double-sided tape.
During repairs, we recommend cleaning all internal mechanisms: the gamepad control buttons, even working ones, will do their job better after cleaning with ordinary alcohol and a cotton swab. 
First of all, you need to disassemble the design of the gamepad:
- Before starting work, it is recommended to seal the buttons with tape so that they do not fall out and are not lost.
- Using a small screwdriver, unscrew all the bolts on the back of the joystick. Attention! On the Xbox 360 controller, one of the screws is hidden under a sticker.
- So that during the subsequent assembly of the structure there are no problems, put all the bolts in one place.
- Next, take the joystick with the AXYB buttons forward and push them out.
- So, we got two parts of the joystick: we can start troubleshooting.
In most cases, sticking problems arise due to the fact that the conductive coating of the closing contacts of the buttons is erased. This problem can be solved.
For this:
- We take the foil, glue it to the double-sided tape and cut out the circles of the size we need. To make it easier to cut foil circles for the closing elements, you can use an ordinary hole punch.
- We glue the circles to the contact contacts of the buttons from the side of the foil.
- Assemble the gamepad in reverse order.
You can repair the buttons of any model of the gamepad with foil, and the principle and method of repair remains the same.
We repair the RB / LB buttons on the Xbox 360 (One) controller
If you play frequently on the Xbox 360, you may experience problems with the RB/LB buttons over time. It is a mistake to blame the quality of construction for all breakdowns. The malfunction is explained by the fact that these buttons are most often used, therefore, due to wear, they stop working.
Let's look at an illustrative example of how repair RB/LB button on Xbox 360 (One) joystick.
For work we need:
- New buttons.
- Soldering iron.
- Copper braid.
We buy new buttons: this can be done on Aliexpress, and you can buy any model that suits us in terms of design, not necessarily for the Xbox 360.
Now you need to disassemble the joystick (use the instructions above).
- Remove the trigger mechanism and potentiometer. We do this with a braid and a soldering iron.
- We solder the tin that fixes the parts with a soldering iron and a copper braid, and then dismantle the non-working button in the same way.
- We insert a new design and solder it. Re-insert the mechanism and potentiometer.
- We collect the joystick and test for performance.
An integral element of any modern game console is the controller. Engineers pay great attention to this accessory in order to work out its ergonomics, functionality and convenience. That is why today any gamepad has so many buttons (unlike the classic controllers for Sega or Dendy). In this connection, often beginners do not immediately understand, for example, where on the Xbox 360 LS joystick. Or what is Guide, LB, LT. This can cause a lot of inconvenience, because in games sometimes only the text designation of the keys appears in the tooltips.
It will not be superfluous to disassemble this problem. Of course, if you don't already have the controller itself, you can in the SavelaGame online store. The gamepad fits both the set-top box itself and a Windows-based personal computer.
Where is the L, LS, LT, LB and other buttons on the Xbox 360 joystick?
To begin with, we will analyze in general the standard arrangement of keys and their set. The modern gamepad for the XBox 360 console includes 17 function buttons. They can be divided into the following groups:
- menu keys - Start, Back, Guide;
- D-pad arrows;
- main buttons A, B, X, Y;
- triggers and bumpers on the end;
- analog sticks or mushrooms.
Of course, there are improved models of controllers, for example, the Pro version for Xbox One. But here the additional keys only copy the functions of the main ones for the convenience of users. But we are now looking at the 360 controller. Where is the L button on the Xbox 360 joystick, as well as LS, LB, RB, etc.? As a rule, L refers to left triggers and bumpers. These are two keys on the end on the left side. One is flat, LB, and the second looks like a trigger or lever - LT. On the right side, similar RB and RT. Where is the LS button on the gamepad? This is the left stick or Left Stick - an analog fungus used to move the character. It is important to note that the button itself is functional, that is, it can be pressed. This will perform a certain action.
How are the keys used?
For beginners, it is quite difficult to understand the functionality of these buttons. Therefore, it does not hurt to briefly consider the most popular solutions used by developers:
- LS, RS - sticks, they are used to move the character (left) and rotate the camera (right), pressing the sticks activates secondary functions, such as crouching or running;
- LT, RT - triggers, in shooters aiming and shot / strike are located on them;
- LB, RB - bumpers, these buttons are responsible for basic functions or for opening a menu, for example, inventory;
- Start, Back, Guide - these keys open the game menu, for example, to save or settings;
- A, B, X, Y - are responsible for direct interaction with game objects.
If the buttons on your Xbox One controller have started to malfunction or stop responding altogether, you may need to replace them. To do this, you need a new set of buttons for joystick xbox one. It includes 4 action buttons, D-pad, pad, analog sticks, bumpers (R1 and L1 buttons) and triggers (R2 and L2).
You will also need such a kit if you want to update the design of your controller. Buttons of different colors are sold on this page (at the same time, parts from the same set are presented in the same gamut). Think about which one would go with the color of your case, and choose the best solution. It will not be difficult for you to do this, because the choice of colors is quite large.
In terms of form and functionality, the buttons from the set are no different from the original ones. You can easily install them instead of the old ones.
How to replace buttons on an Xbox One controller
You will need to disassemble the gamepad to insert the parts you need, but this is not difficult. Anyone can do this in a few minutes. Of the tools, you only need a Torx T8 screwdriver (you can easily find it in stores) and a special spatula for disassembling electronics. If there is no spatula, you can take any other similar item.
Remove the battery cover and remove the battery or batteries. After that, disconnect the plugs on the handles. To do this, insert the spatula into the seam between the panels and carefully detach all the clips along its line.
In the middle of the panel, which is located in the battery compartment, there is a screw. Unscrew it with a Torx T8 screwdriver. To do this, you have to break through the sticker under which it is located. Please note that if you do this, you will void your controller warranty.
By removing this screw and all the others, you will be able to separate the front and back panels. After that, you can change the buttons. To assemble the gamepad, repeat all the steps in reverse order.
|
1
left stick |
9
expansion port |
left stick (1) right stick (10) :These are small joysticks, raised above the controller surface, with concaved rubbery pads. The left stick resides on the lower left of the front face of the controller, and the right stick resides on the lower right of the front face. The sticks are used to interact with games, apps, and the Xbox One interface. These move directionally, and they can also function as clickable buttons when you press down on them.
left bumper (2) right bumper (7) : These are oblong-shaped pressable controls that reside on the top of the controller to the left and right of the USB charging port. These controls are used to interact with games, apps, and the Xbox One interface. They are often used as accelerators to jump between sections of the UI but have varied functionality depending on the game.
View button (3) : This button resides just to the lower left of the Xbox button (around 7 o "clock). Use this button to focus in on an activity in a game or app, such as pulling up a map during a role-playing game or accessing the address bar in Internet Explorer.
USB charging port (4): .
Xbox button (5): This button resides at the top front face of the controller (12 o "clock position). It is slightly recessed and round. It has multiple functions:
- When the controller or console is turned off, hold this button to turn on the console. If the console is already on and the controller is off, hold this button to turn on the controller.
- When the controller and console are already on, hold this button to turn off the console.
- When the controller and console are already on, press and hold this button until it rumbles and from there you can turn on Narrator or magnifier. See Turn on Narrator on Xbox One for more info.
- When using the console, press this button once to open the guide.
- When using the controller with a Windows 10 device, this button opens the Game bar when pressed during PC gameplay. Exception: During game streaming through the Xbox App for Windows 10, pressing this button returns you to the Home screen of the Xbox App for Windows 10.
menu button (6): This button resides just to the lower right of the Xbox button (around 5 o "clock). Use this button to access game and app menu options like Settings or Help, along with commands within the user interface such as Enter on a keyboard.
Directional pad (D-pad) (8) : This is a raised plus sign-shaped toggle that resides between the left and right thumb sticks. It moves the focus up, down, right, and left in the UI. Used to interact with games, apps, and the Xbox One interface.
expansion port (9) : This is a recessed port that resides on the bottom-side edge of the controller. It's used to connect other accessories, such as an Xbox One Chat Headset.
3.5mm port (16)
A , B , X , Y buttons:These buttons sit on the right side of the controller. The Y button sits in 12 o "clock position, with B, A, and X positioned clockwise. Used to interact with games, apps, and the Xbox One interface.
The bottom and back of the wireless controller
 Original Xbox One Wireless Controller Original Xbox One Wireless Controller
|
 Xbox One Wireless Controller Xbox One Wireless Controller |
|
2
left bumper |
12
IR window |
left bumper (2) right bumper (7): These are oblong-shaped pressable controls that reside on the top of the controller to the left and right of the USB charging port. These controls are used to interact with games, apps, and the Xbox One interface. They are often used as accelerators to jump between sections of the UI but have varied functionality depending on the game.
USB charging port (4):This port resides on the top edge of the controller above the Xbox button. It's a recessed mini USB port, whichconnects your wireless controller to the console using a mini USB cable. For more information, see About the Xbox One Play & Charge Kit .
expansion port (9): This is a recessed port that resides on the bottom-side edge of the controller. It's used to connect other accessories, such as an Xbox One Chat Headset.
Infrared (IR) window (12): Hidden behind the “smoked” plastic next to the USB port are infrared LEDs used for auto-pairing users to the controller via the Kinect sensor. To learn more about this feature, see How to assign an account to an Xbox One Wireless Controller .
Wireless Enrollment Button (13):This small, slightly raised button resides just to the left of the USB port on the top edge of the controller. Used to wirelessly connect the controller to a console and to enroll in Bluetooth pairing on a Windows 10 PC. For more information, see Connect a wireless Xbox One controller to your console .
right trigger (11) and left trigger (14) : Positioned just below the bumpers on the front-top edge of the controller. These are pressable controls most commonly used during gameplay. They often vibrate to provide feedback during the games, though you can turn off vibration in the controller settings.
battery cover (15):Sits on the middle back of the controller.
3.5mm port (16): This is a recessed port next to the expansion port on the bottom-side edge of the controller. Used to connect compatible 3.5mm audio devices. Only available on controllers released after June 2015.
Did this resolve your issue?
Thank you for your feedback
Thanks for your feedback! |
We're sorry this article didn't solve your problem. We won't give up and neither should you. Try this community option, below.
