With this lesson, I want to continue the line of learning how to work with the office suite. Microsoftoffice, which I adhered to at the very beginning of the creation of this blog. And it just so happened that I still have not touched on another useful tool from this arsenal of programs that are certainly indispensable in our lives. Well, I think you can still find a free alternative to them, such as openoffice or libreoffice. But the alternative is for that and an alternative, in order to only copy the capabilities of its older brother MSoffice, which, by the way, has been on this market for a long time and all the above-named free analogues in their functionality are guided precisely by this package. Although, in my opinion, we have moved a little away from the topic, I casually mentioned one useful program, and as you might have guessed from the title, this is a program for creating presentations - MSpowerpoint.
First of all, let's try to ask ourselves why presentations are needed at all.
In general, they can be used for various purposes ... whether it is an advertisement for a product or technology, or it can simply be a detailed illustration of educational material. You can use them as you like ... But the explanation given above is somewhat abstract. If you look at all this from a different angle, then the presentation can be imagined as a collection of slides that sequentially replace each other, either after a specified time, or in manual mode. And we will consider some subtleties, already in the process of work.
Well, let's start studying. Version 2010 will be considered, although there are changes for other versions of the program, they concern the main interface. The essence remains the same.
When you first start the program, you will see such a welcome window.
In the screenshot, I tried to show where and what is located. I hope it turned out clearly, and if it’s still not very good, then further down the text, as well as simultaneously performing tasks on your computer, there should not be any incomprehensible moments. However, it is the same in almost every case. So don't worry about it.
In the course of further work with the program, we will mainly use the toolbar home, which contains the most commonly used tools. The second most used toolkit is concentrated in the tab Insert. We will not use other tabs, at least in this lesson.
All operations that we will perform using the toolbar will be performed on the current slide, that is, the one that is visible to us at the moment. If we want to select another slide, then for this we select it by clicking the left mouse button on the left side of the screen on the slide that you want to make active.
By default, the program starts with one already created. slide, which already has elements like Slide Title and Slide subtitle.

To change the inscription, just click on some element and start typing something there from the keyboard. Try to enter something. For example, this is what happened to me.

If you want to move these two elements to another location, then there is nothing easier. To do this, simply select the element by clicking on it with the mouse button, and a frame will appear indicating the borders of that element. After that, you need to bring the mouse cursor directly to this border (the mouse cursor will change its shape at the same time), and holding the left mouse button, move the element to the desired location.
In addition, the program already has several layouts with a predetermined arrangement of elements. To do this, select Toolbars paragraph Layout, and click on the arrow next to it - from the list of drop-down ready-made templates, you can select the one you need.

You can just start by experimenting with different layouts. You can always return to the default layout by selecting Reestablish.
In addition, we can create new slides by clicking on the drop-down menu button − Create slide. In this case, you can immediately choose which layout will be applied to new slide.
The next dropdown button we'll look at is called Chapter. So let's move on to the topic...
Why are there sections in PowerPoint?
Sections are used to group slides. Let's say we're doing a presentation, and we have about thirty slides that relate to one big topic. Of course, in order for the information to be presented effectively, it is desirable to divide it into sections (subsections) - in this case, the lecturer will not get confused in the slides replacing each other, since it is possible that he will have to return to some topic. And thanks to such division into subsections, he will not have to remember on which slide he told what he wanted to return to, and it will be easier for the listener to navigate in all this diversity. That's what sections are for - so that there is no chaos in the head.
For clarity, to understand what's what, let's try to create four slides. Two of them will have the text “ This slide belongs to section 1”, and two slides that will have text - “ This slide belongs to section 2”.At the same time, we will practice creating slides.
Now let's create two sections by clicking on the corresponding drop-down button Chapter, and selecting the menu item Create section:

By the way, by default, when creating slides, they are all grouped into a section, which is called - Default section. All subsequent sections created by us will be shown in the section, which is displayed in the panel with slides as Section without a title.
What then to do if we want to rename the section?
To do this, you will need to select this section in the panel on the left, and using the same drop-down menu of the list button, select the item Rename section.
In the figure, the selected partition (the one with which some operation will take place) is highlighted in orange.

Let's create two sections, one will be called - Section 1, another - Section 2.
Ok, sections are created. Now we need what? Drag slides to desired sections. There is nothing easier. We simply take the slide we need, click on it with the left mouse button, and holding it, move it to the section we need.
In the end, this is what should happen.
Let's now try to spice up our presentation by adding some pictures to the slide. Moreover, a presentation without pictures is not a presentation at all.
To do this, you will need to go to the tab Insert, click on the icon Picture and choose any picture you like. After the picture appears on the slide, it will also be possible to perform any operations with it - copy, move, transform, etc.
Please note that if you want to maintain proportions when enlarging or reducing the image, then the image should be stretched by the corner. If you stretch only in height or in width, distortion is possible.
Everything seems to be clear. But still, you can ask a fair question...
What is the difference between the Picture button and the Picture button?
The question is good. It seems to be in the sense that these two functions should perform the same operation ... and in fact it is so. But still there are some nuances. With button Picture, we carry out the operation that we did above. And if we click on the icon Picture, then a search window will open, in which it will be possible to set the name of the object that we want to find (including the picture). Here we can also specify the type of object: Illustrations, Photos, Video, Sound. The search will be performed in the built-in collection of the Microsoft Office package, and if you check the “ Enable Site Content // January 9, 2014 //
The presentation is needed by the speaker for a more detailed explanation of some information, and the Presentation itself is a visual aid for this information. You can make a presentation in PowerPoint 2010 which is included with Microsoft Office. A PowerPoint presentation can consist of several slides that will display various charts, tables, images, videos, and text. But in order to make a presentation yourself, you need to know how to make a presentation in PowerPoint correctly and what subtleties and tricks you can apply.
Slides
Creating presentations in PowerPoint starts with creating slides. To make a beautiful presentation in PowerPoint, we create the first and several more slides, and for this, on the Home tab, click Create Slide as many times as you need slides for your presentation.
How to add a slide to a PowerPoint presentation
If you have slides for a PowerPoint presentation on your computer, you can insert them into your presentation. To insert a presentation into a PowerPoint 2010 presentation, you need to select the slide that you want to replace with your own in the left column and go to the Insert tab. On this tab, click Object and in the window that opens, check the box next to Create from file. Then click the Browse button and select your file with the finished slide, click the Open and OK button.
If you have created extra slides, you can easily delete a slide from your PowerPoint 2010 presentation. To do this, first hover over the unwanted slide, press and release the left mouse button, and then press the Del key on your keyboard.
All slides are created with a standard layout that has room for a title and text below it. If you need to change the layout for a PowerPoint presentation, for example, so that there is a place for a title and two places for text below it, then you will need to click Layout on the Home tab. Various slide layouts will open from which you need to select the one you want.
 How to Make a Background in a PowerPoint Presentation
 To make a beautiful background for your PowerPoint presentation, go to the Design tab and click Themes. Various free themes for PowerPoint 2010 presentations will open, from which you need to select the one you need, and to do this, hover over this topic and click the left mouse button.
Text
Typing is very easy, just move the cursor over the area in which you want to enter the text and press the left mouse button. You can not only type text from the keyboard, but also paste text into PowerPoint by simultaneously pressing two Ctrl + V keys on the keyboard after copying the text from somewhere.
 Can rotate frames for PowerPoint presentation
 The written text can be rotated. To do this, move the cursor over the text and press the left mouse button. The text will have a frame, and a small circle will appear in the center above the frame. Move the cursor over this circle so that the cursor is in the form of a rounded arrow, hold down the left mouse button and move the cursor to the right or to the left, depending on which direction you need to rotate the text.
The written text can be moved; for this, it is enough to move the cursor over the border line of the frame in which the text is written and when the cursor becomes in the form of a cross, you will need to hold down the left mouse button and drag the text to the desired location.
You can edit or change the text in PowerPoint, that is, change the font size, color, slant and much more, and for this you need to select the text that you want to edit.
Graphs and charts
To visually show the changes in some data, you can build a graph or create a chart.
 Plotting in PowerPoint
 Build graphs and charts on the Insert tab by clicking on charts. A window will open in which you can select the chart that suits you or the chart you need. By selecting and clicking on a graph or chart, Excel will open in which you need to create a table with data for the graph or chart.
Pictures
If you insert a picture into a PowerPoint presentation, it will look very impressive. Figures for the PowerPoint presentation should be selected in advance and not be very small.
 Insert selected pictures for PowerPoint
 Insert pictures for presentations in PowerPoint on the Insert tab by clicking on Picture. A window will open in which you need to find the place where your drawings are located, select the one you need by clicking on it with the left mouse button and click the Insert button.
Sound
It's very easy to add sound to a PowerPoint presentation. If you have already recorded sound for a PowerPoint presentation and it is in your file on your computer, then insert the sound into the presentation on the Insert tab by clicking on Sound. A window will open in which you need to find the location where your sound file is located, select it by clicking on it with the left mouse button and click the Insert button.
 How to insert audio into a PowerPoint presentation
 If you want to record sound in PowerPoint, then on the Insert tab, click on the small triangle that is located under the Sound icon. A context menu will open in which you need to select the Record sound item. After that, a window called Sound Recorder will open in which everything is very simple and clear how to record.
Video
You can insert a video into a PowerPoint 2010 presentation by first removing it and saving it as a file on your computer. You can also add a video to a PowerPoint presentation from some video hosting site, such as YouTube.
 Inserted video for PowerPoint presentation
 To insert a video in PowerPoint 2010 that is on your computer, you need to go to the Insert tab and click the Video icon. A window will open in which you need to find the location where your video file is located, select it by clicking on it with the left mouse button and click the Insert button.
To add a video to PowerPoint from a video host, you must first copy the HTML code of this video, and then go to the Insert tab and click on the small triangle that is located under the Video icon. A context menu will open in which you need to select the Video from a video site item. A window called Embed Video from Website will open. Paste the previously copied HTML code on the video into this window and click the Paste button.
Transitions and animations
In order for the presentation to be beautifully designed, it is recommended to apply animation to the transitions between slides in PowerPoint. Animation for PowerPoint presentations is overlaid on each slide. You can make the animation in a PowerPoint presentation between slides the same or different for each slide.
To make transitions in PowerPoint with animation, you need to go to the Transitions tab. On this tab, select a slide and select the transition you like on the PowerPoint toolbar and click on it.
You can insert an animation in your PowerPoint presentation for each area on a slide, such as an inserted picture, a graph, or text. Moreover, several animations can be applied to each area of the slide, which will be shown in the order in which you set them on the slide. To make an animation in PowerPoint on a slide in any area, you need to go to the Animation tab. On this tab, first in the left column, select the slide on which the animation will be made in PowerPoint, and then select the area on the slide and click Add animation. A contextual list will open with all possible animations.
View
To see what kind of presentation you got, just turn on viewing PowerPoint presentations by pressing the F5 key on your keyboard or go to the Slide Show tab and click on From Beginning. You can also launch a presentation in PowerPoint by clicking the Reader Mode icon at the bottom of the program.
 In PowerPoint, a slideshow on the Slide Show tab
 To end a PowerPoint presentation, press the Esc key. The demonstration of a presentation in PowerPoint can be configured in advance by specifying the display time and extension for each slide. By launching the presentation view in PowerPoint, you can make the cursor bright in the form of a red circle. To do this, hold down the Ctrl key on the keyboard and press the left mouse button.
To save a presentation in PowerPoint 2010, you need to click on File and select Save As from the context menu that opens. A window will open in which you need to select the folder in which the presentation will be stored, give some name to the file, and leave the file type in the PowerPoint Presentation format and then click the save button.
Microsoft PowerPoint is a powerful set of presentation tools. When you first explore the program, it may seem that creating a demo here is really easy. Maybe so, but most likely a rather primitive version will come out, which is suitable for the most minor shows. But to create something more complex, you need to delve into the functionality.
First of all, you need to create a presentation file. There are two options here.


Now that PowerPoint is working, we need to create the slides - the frames of our presentation. The button is used for this. "Create Slide" tab "Home", or a combination of hot keys "Ctrl" + "M".

Initially, a title slide is created, which will show the title of the presentation topic.

All further frames will be standard by default and have two areas - for the title and content.

A start. Now all you need to do is fill your presentation with data, change the design, and so on. The order of execution does not really matter, so the next steps do not have to be done sequentially.
Appearance customization
As a rule, even before the start of filling the presentation with data, the design is configured. For the most part, they do this because after adjusting the appearance, existing site elements may not look very good, and you have to seriously rework the finished document. Because most often they do it right away. To do this, use the tab of the same name in the header of the program, it is the fourth from the left.
To configure, go to the tab "Design".

There are three main areas here.
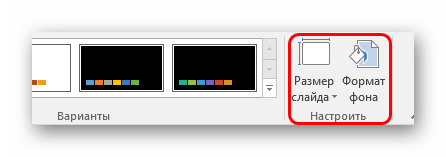
It is worth talking about the last option in a little more detail.
Button "Background Format" opens an additional side menu on the right. Here, in the case of installing any design, there are three tabs.


These tools are quite enough to make the presentation design not only colorful, but also completely unique. If the presentation does not have the specified standard style selected by this time, then in the menu "Background Format" will only "Pouring".
Slide layout customization
As a rule, before filling the presentation with information, the format is also configured. There is a wide range of templates for this. Most often, no additional layout settings are required, since the developers provide a good and functional assortment.


If, nevertheless, there is a need to create a slide in a layout that is not provided for by standard templates, then you can make your own blank.


At the end of all work, press the button "Close sample mode". After that, the system will return to working with the presentation again, and the template can be applied to the slide in the manner described above.

Filling with data
Whatever was described above, the main thing in the presentation is filling it with information. Anything can be inserted into the show, as long as it harmoniously combines with each other.
By default, each slide has its own title and a separate area is allocated for this. Here you should enter the name of the slide, the topic, what is being said in this case, and so on. If a series of slides speaks about the same thing, then you can either delete the title, or simply do not write anything there - the empty area is not displayed when the presentation is shown. In the first case, you need to click on the border of the frame and click the button Del. In both cases the slide will not have a title and the system will label it as "nameless".

Most slide layouts use "Content area". This section can be used both for entering text and for inserting other files. In principle, any content added to the site automatically tries to occupy this particular slot, adjusting to the size on its own.

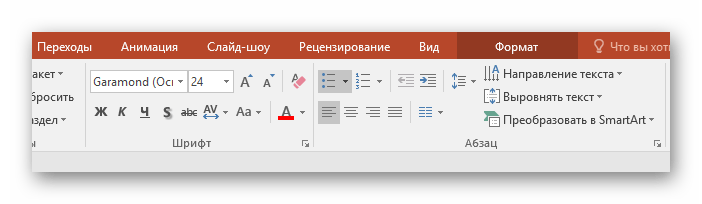
If we talk about text, then it is easily formatted using standard Microsoft Office tools, which are also present in other products of this package. That is, the user can freely change the font, color, size, special effects and other aspects.
As for adding files, the list is wide. It can be:
- Pictures;
- Mathematical, physical and chemical formulas;
- SmartArt schemes, etc.
To add all this, a variety of methods are used. In most cases, this is done through the tab "Insert".

Also, the content area itself contains 6 icons for quickly adding tables, charts, SmartArt objects, pictures from a computer, images from the Internet, and video files. To insert, you need to click on the corresponding icon, after which the toolkit or browser will open to select the desired object.
Inserted elements can be freely moved around the slide with the mouse, manually selecting the desired layout. Also, no one forbids changing sizes, position priority, and so on.
Additional functions
There is also a wide range of different features that enhance the presentation, but are not required to be used.
Transition setup
This point is half related to the design and appearance of the presentation. It does not have such paramount importance as setting up the external one, so it is not necessary to do it at all. This toolkit is located in the tab "Transitions".

In the area of "Go to this slide" presents a wide selection of different animation compositions that will be used to transition from one slide to another. You can choose the presentation you like the most or suit the mood of the presentation, as well as use the customization function. The button is used for this. "Effect Options", each animation has its own set of settings.
Region "Slide Show Time" no longer has to do with visual style. Here you can set the duration of viewing one slide, provided that they will change without the author's command. But it is also worth noting here the important button for the last paragraph - "Apply to all" allows you not to apply the transition effect between slides on each frame manually.

Animation settings
You can add a special effect to each element, whether it is text, a media file or anything else. It's called "Animation". The settings for this aspect are located in the corresponding tab in the program header. You can add, for example, the animation of the appearance of an object, as well as the subsequent disappearance. Detailed instructions for creating and configuring animation can be found in a separate article.
Hyperlinks and control system
In many serious presentations, control systems are also set up - control keys, slide menus, and so on. For all this, the hyperlink setting is used. Not in all cases, there should be such components, but in many cases this improves perception and systematizes the presentation well, practically turning it into a separate manual or program with an interface.
Outcome
Based on the foregoing, we can come to the following most optimal algorithm for creating a presentation, consisting of 7 steps:
- Create as many slides as you need
It is far from always possible for the user to say in advance how long the presentation will be, but it is best to have an idea. This will help in the future to harmoniously distribute the entire amount of information, set up various menus, and so on.
- Customize visual design
- Distribute slide layout options
To do this, either existing templates are selected, or new ones are created, and then distributed to each slide individually, based on its purpose. In some cases, this step may even precede the setting of the visual style, so that the author can adjust the design parameters just for the chosen arrangement of elements.
- Enter all data
The user brings all the necessary text, media or other types of data into the presentation, distributing it over the slides in the desired logical sequence. All information is edited and formatted here.
- Create and configure additional elements
At this stage, the author creates control buttons, various content menus, and so on. It is also not uncommon for individual moments (for example, creating slide control buttons) to be created during the framing stage so that you do not have to manually add buttons each time.
- Add secondary components and effects
Setting animations, transitions, background music and so on. Usually done already at the last stage, when everything else is ready. These aspects have little effect on the finished document and can always be abandoned, which is why they are dealt with last.
- Check and fix bugs
It remains only to double-check everything by running the preview, and make the necessary adjustments.

Additionally
In the end, I would like to make a couple of important points.
- Like any other document, a presentation has its own weight. And it is the larger, the more objects are inserted inside. This is especially true for music and video files in high quality. So you should once again take care to add optimized media files, since a multi-gigabyte presentation not only presents difficulties with transportation and transfer to other devices, but in general can work extremely slowly.
- There are various requirements for the design and content of the presentation. Before starting work, it is best to find out the regulations from the management, so as not to make a mistake and not come to the need to completely redo the finished work.
- By the standards of professional presentations, it is recommended not to make large piles of text for those cases where the work is intended to accompany a presentation. No one will read all this, all the basic information should be delivered by the announcer. If the presentation is intended for individual study by the recipient (for example, an instruction), then this rule does not apply.
As you can understand, the procedure for creating a presentation includes many more options and steps than it might seem from the very beginning. No tutorial will teach you how to create demos better than just experience. So you need to practice, try different elements, actions, look for new solutions.
Presentation Presentation is a way of presenting information. A presentation consists of successive frames called slides. Each slide contains information of various types: text, images, audio and video files.

Types of presentations Presentations with scenarios (focused on supporting the report for a large audience). Interactive presentations that run under the control of the user. Continuously running presentations. Depending on the goals, the following types of presentations are distinguished: Trade and marketing presentations Educational presentations. Accompanying scientific reports.


The slide consists of 6 main parts: 1. Header. Located at the top; 2. The text of the slide is its main part. It most often represents a bulleted or numbered list. The text displayed on the slide is entered into a special box called a placeholder; 3.Slides may contain pictures, diagrams, video clips, sound files and other information. To place them on the slide, there is a place defined by the placeholder; 4.Date and time. Placed on the slide in the lower left corner; 5.Footer. If necessary, located at the bottom of the slide; 6. Slide number. Displayed in the lower left corner. SLIDE STRUCTURE


Tabbed Ribbon Contains tabbed panels with command and tool buttons. Slide Pane The Structure tab displays the constituent elements of a presentation as an outline. The Slides tab displays thumbnail images of the slides in the presentation. Slide editing area Designed to display the current slide. Notes Panel Designed to enter the text of the notes that you want to add to the slide. Status bar The bottom line of the main program window contains information about the current slide opened in the window. File Viewing Modes MAIN ELEMENTS OF THE POWERPOINT INTERFACE

TABBED RIBBON File (File); The File tab contains a standard set of operations performed on a PowerPoint file. Home (Home); The Home tab contains elements for creating and formatting objects: slides, sections, text, drawings, lines, captions, various geometric shapes, etc. Insert (Insert); The Insert tab contains controls for inserting all the necessary objects.

Design (Design); The Design tab is intended for developing a general presentation concept: selecting the most appropriate general style, color schemes for slides, and composition. Transitions; The Transitions tab contains tools for setting up smooth transition effects between slides. Animation (Animations); The elements on the Animation tab allow you to set the appearance of the contents of the slide on the screen during the presentation. Slide Show; The Slide Show tab contains elements for viewing the finished presentation in full screen mode and performing the necessary preparation for the show. TABBED RIBBON

Reviewing (Review); The Reviewing tab contains controls for reviewing and performing additional operations on the presentation. View. The View tab contains commands that allow you to change presentation view modes, sample settings, and commands that call auxiliary tools to optimize working with multiple PowerPoint files at the same time. Add-ons; The Add-ons tab is an auxiliary software extension that allows you to integrate with various software packages and appears when additional add-ons are available. TABE TABE

File tab Using the controls on this tab, you can: find out general information about presentation files in the Details section save finished presentations in selected directories on the computer's hard drive using the Save or Save as command; close presentations with the command Close (Close) and open with the command Open (Open); in the Recent section, view presentations that have been worked on recently; create presentations from ready-made templates and themes proposed in the Create (New) section; print presentations after setting the print settings in the Print section.

Home tab Using the controls on this tab, you can: create new presentation slides by clicking the New slide button; perform operations of cutting, copying and pasting objects using the controls of the Clipboard group; organize slides into sections using the Sections button; perform text formatting using the elements of the Font (Font) and Paragraph (Paragraph) groups; insert shapes into slides by selecting them from the list in the Drawing group, and format them. search for the desired slides in the presentation using the Find button, as well as perform text replacement and selection operations.

Insert tab Using the controls on this tab, you can: add tables to slides (button Table (Table)); place images: drawings from a file, pictures, screenshots, photos; create your own photo albums using the Photo Album Wizard (Photo Album); add illustrations as shapes from presets, SmartArt drawings, or diagrams; add links and hotspots to presentations, as well as special characters; insert such informative text elements as date and time, inscriptions, headers and footers, etc. (Text group (Text)); add multimedia objects to the presentation using the Video (Video) and Sound (Audio) commands.

Design Tab Using the controls on this tab, you can: select suitable PowerPoint themes for your presentations using the suggested collection of themes (Themes group); use the built-in themes as a basis for creating your own by changing the parameters Colors (Colors), Fonts (Fonts), Effects (Effects), Background Styles (Background Styles), etc .; choose the size of the slides when preparing a presentation for printing using the Page Setup command; change the position of the slide on the sheet using the Slide Orientation command; control background properties.

Transitions tab Using the controls on this tab, you can: choose your favorite transition effects from those presented in the Transition to This Slide group; view and set the parameters of the selected effect by clicking on the Effect Options button; connect sound files to the slide using the Sound drop-down list; adjust the duration of the transition effect using the input field with the counter Duration (Duration). set the way the slide changes on the screen during the demonstration. Preview the current slide by clicking the Preview button.

Animation tab Using the controls on this tab, you can: select animation schemes for objects selected on slides from the samples presented in the Animation Styles list; view and set the parameters of the selected effects by clicking the Effect Options button; change the animation start method, duration, pause, start order in the Timing group; show/hide the Animation Pane panel; view the animation effects of the current slide by clicking the Preview button on the Animation tab or animation area.

Slide Show tab Using the controls on this tab, you can: start a slide show from the first (title) slides using the From Beginning button; set display parameters using the dialog box called by the Set Up Slide Show command; hide selected slides using the Hide Slide command; use the Rehearse Timings command to fix the time that will be spent on demonstrating each slide; change the screen resolution by selecting the desired value in the Resolution drop-down list.

View tab Using the controls on this tab, you can: change the current slide display mode; use and create design samples: Slide Master, Handout Mater, Notes Master; display additional elements to align objects on the slide; set a convenient display scale using the Zoom and Fit to Window commands; set the color scheme of the slides by selecting one of the options: Color (Color), Grayscale (Grayscale), Black and white (Black and White); arrange views for open PowerPoint files using commands in the Window group.


When writing the main part of the speech, it is necessary to draw up a work plan in which the sequence of presentation of the main issues should be determined, i.e. the composition of the text. The main requirement for the composition is the logical sequence and harmony of the presentation of the material. It is important to arrange the material in such a way that it helps to reveal the main idea of the speech.

When drawing up a working plan for a speech, two options are possible: the first is to keep the composition of the original text if the speech is a retelling of any one article, book, etc.; the second is to change the composition of the original text (texts), choosing the way of presenting the material that best suits the purpose of the speech, the audience in front of which you will speak, the duration of the speech and other factors.

Stages of preparing a presentation The first stage is planning, which includes studying the audience and determining the purpose of the presentation. The second stage is preparation, which includes the collection of information, the development of content, the selection of effective visual means, the clarification of the duration of the speech, and the preparation of a presentation plan.

There are certain requirements that will help design a slide: a title for each slide (the presence of titles shows your ability to structure information); parallelism of grammatical forms and parts of speech (when making lists or enumerations, this requirement should be followed, i.e., use infinitive constructions or verbal nouns);

Contrast in the color scheme (light letters on a dark background or vice versa); the unity of the color scheme of the entire presentation; font size: heading - 32-48, text - 24-28 (at least 18); fonts - Tahoma, Arial, Courier, Times New Roman; slide numbering (numbering is needed so that the speaker can quickly find the slide if the need arises).

One slide should contain one idea (which is why titles are needed for each slide); one thought-statement should be one line; one slide should contain 5–6 lines (no more than 10 lines should be placed on a slide); one line should consist of 5-6 words; one slide is shown for one minute.

The last thing that needs to be done at the preparation stage is to draw up a presentation plan, that is, prepare an oral presentation. A presentation, like an oral presentation, is recommended to be built according to the following scheme: identify the problem, talk about the study and its results, and draw conclusions. One of the main tasks in communication is to grab attention, so you should think about how you start and end the presentation.


If the question is difficult in content, then: a) ask to repeat the question; accents, and even the whole meaning, can change in it; b) repeat the question as you understand it; c) ask for a few minutes to think; d) Give a similar example from your own experience.

Tips 1. The nature of the report you are reading (scientific research, review, implementation of a technical project, report, and so on). This determines the overall style of the presentation. 2. The audience your presentation is aimed at. This determines the specific design of the presentation.

In today's article, we will take a closer look at how to make a presentation, what problems arise during production, what you should pay attention to. Let's look at some subtleties and tricks.
In general, what is it? Personally, I would give a simple definition - this is a brief and visual presentation of information that helps the speaker to reveal the essence of his work in more detail. Now they are used not only by businessmen (as before), but also by ordinary students, schoolchildren, and in general, in many areas of our life!
As a rule, the presentation consists of several sheets on which images, diagrams, tables, and a brief description are presented.
And so, let's begin to deal with all this in detail ...
Main components
The main program for work is Microsoft PowerPoint (moreover, it is on most computers, because it comes with Word and Excel).
Presentation example.
Text
The best option is if you yourself are in the topic of the presentation and can write the text from personal experience yourself. For listeners, it will be interesting and exciting, but this option is not suitable for everyone.
You can get by with books, especially if you have a good collection on your shelf. Text from books can be scanned and recognized, and then translated into Word format. If you do not have books, or there are not enough of them, you can use electronic libraries.
In addition to books, essays can be a good option, perhaps even those that you yourself wrote and handed over earlier. You can use popular sites from the directory. If you collect several interesting essays on the desired topic, you can get an excellent presentation.
It will not be superfluous to simply search for articles on the Internet in various forums, blogs, and sites. Very often come across excellent materials.
Pictures, diagrams, graphs
Of course, the most interesting option would be your personal photos that you took in preparation for writing the presentation. But you can get by with a Yandex search. In addition, there is not always time and opportunity for this.
Graphs and diagrams can be drawn by yourself if you have any patterns, or you have calculated something using a formula. For example, for mathematical calculations, there is an interesting graph program.
If you can’t find a suitable program, you can also make a schedule manually, draw it in Excel "e, or just on a sheet of paper, and then photograph or scan it. There are many options ...
Video
Shooting a high-quality video is not an easy task, and even more expensive. One video camera is not affordable for everyone, and you also need to properly process the video. If you have such an opportunity - by all means use it. And we'll try to get by...
If the quality of the video can be neglected a little, a mobile phone will do for recording (many "middle" price categories of mobile phones have cameras installed). Some things can also be removed to them in order to show in detail some specific thing that is difficult to explain in the picture.
By the way, many popular things have already been filmed by someone and can be found on youtube (or other video hosting sites).
And another interesting option for creating a video - you can record it from the monitor screen, and add more sound, for example, your voice telling what is happening on the monitor screen.
Perhaps, if you already have all of the above and are on your hard drive, you can start making a presentation, or rather, its design.
How to make a presentation in PowerPoint
Before moving on to the technical part, I would like to dwell on the most important thing - the plan of the speech (report).
Plan
No matter how beautiful your presentation is - without your speech, it is just a collection of pictures and text. Therefore, before you start doing, decide on a plan for your performance!
First, who will be the audience for your presentation? What are their interests, what would they like more. Sometimes success depends no longer on the completeness of the information, but on what you focus on!
Second, determine the main purpose of your presentation. What does it prove or disprove? Perhaps she talks about some methods or events, your personal experience, etc. You should not interfere with different directions in one report. Therefore, immediately decide on the concept of your speech, think over what you will say at the beginning, at the end - and, accordingly, what slides and what information you will need.
Thirdly, most speakers cannot correctly time their report. If you are given very little time, then making a huge report with video and sounds is almost pointless. Listeners won't even have time to watch it! It is much better to make a short presentation, and place the rest of the material in another article and to everyone who is interested - copy it to media.
Working with a slide
Usually, the first thing they do when starting work on a presentation is to add slides (that is, pages that will contain text and graphic information). This is easy to do: launch Power Point (by the way, the example will show version 2007), and click "home / create slide".
By the way, slides can be deleted (click on the one you need in the column on the left and press the DEL key, move, swap places with each other - with the mouse).
As we have already noticed, our slide turned out to be the simplest: a title and text under it. To be able, for example, to place the text in two columns (it is easy to compare objects in this arrangement), you can change the layout of the slide. To do this, right-click on the slide on the left in the column and select the setting: "layout/...". See picture below.
I will add a couple more slides and my presentation will consist of 4 pages (slides).
All pages of our work are still white. It would be nice to give them some design (i.e. choose the right theme). To do this, open the Design/Themes tab.
Now our presentation is not so faded...
It's time to move on to editing the text information of our presentation.
Work with text
Working with text in Power Point is simple and easy. It is enough to click in the desired block with the mouse and enter the text, or simply copy and paste it from another document.
Also, with the help of the mouse, it can be easily moved or rotated if you hold down the left mouse button on the border of the frame surrounding the text.
By the way, in Power Point, as in regular Word, all misspelled words are underlined with a red line. Therefore, pay attention to spelling - it is very unpleasant when you see blunders at a presentation!
In my example, I will add text to all pages, it will look something like this.
Editing and inserting graphs, charts, tables
Charts and graphs are usually used to visually demonstrate the change in some indicators relative to others. For example, show the profit of this year, relative to the past.
To insert a chart, click in Power Point: "insert/charts".
To insert tables, click on: "insert/table". Please note that you can immediately select the number of rows and columns in the created table.
Working with media
It is very difficult to imagine a modern presentation without pictures. Therefore, it is highly desirable to insert them, because most people will be bored if there are no interesting pictures.
For starters, do not shrink! Try not to put too many pictures on one slide, make the pictures bigger and add another slide. From the back rows, sometimes it is very difficult to see the small details of the images.
Adding a picture is simple: click "insert/images". Next, choose the place where you store the pictures and add the one you need.
Embedding sound and video are very similar in nature. In general, these things are not always and everywhere worth including in the presentation. Firstly, it is not always and everywhere appropriate if you have music playing in the middle of the silence of listeners trying to analyze your work. Secondly, the computer on which you will present your presentation may not have the necessary codecs or any other files.
To add music or a movie, click: "insert/movie(sound)", then specify the location on your hard drive where the file is located.
The program will warn you that when viewing this slide, it will automatically start playing the video. We agree.
Overlay effects, transitions and animations
Probably, many have seen at presentations, and even in films, that beautiful transitions are made between some frames: for example, a frame is like a page of a book, turns over to the next sheet, or smoothly dissolves. The same can be done in Power Point.
To do this, select the desired slide in the column on the left. Next, under Animation, select Transition Style. There are dozens of different page changes to choose from! By the way, when you hover over each one, you will see how the page will be displayed during the demonstration.
Important! The transition only affects the one slide you have selected. If you selected the first slide, then the launch will begin with this transition!
How to avoid mistakes
- Check your spelling. Gross spelling mistakes can completely ruin the overall impression of your work. Errors in the text are underlined with a red wavy line.
- If you used sound or movies in your presentation and you are not going to present it from your laptop (computer), then copy these multimedia files along with the document! It will not be superfluous to take the codecs with which they should be played. Very often it turns out that on another computer these materials are missing and you will not be able to demonstrate your work in full light.
- follows from the second paragraph. If you plan to print the report and present it in paper form, then do not add video and music to it - it will still not be seen and heard on paper!
- A presentation is not only slides with pictures, your report is very important!
- Do not shrink - it is difficult to see small text from the back rows.
- Do not use faded colors: yellow, light gray, etc. Instead, replace them with black, dark blue, burgundy, etc. This will allow listeners to see your material more clearly.
- The last tip will probably be very useful to students. Don't put off development until the last day! According to the law of meanness - on this day everything will go awry!
In this article, in principle, we have created the most ordinary presentation. In conclusion, I would not like to dwell on some technical points, or advice on using alternative programs. In any case, the basis is the quality of your material, the more interesting your report (add photos, videos, text to this) - the better your performance will be. Good luck!
contemplative