Craft "Rocket" will be an ideal gift for a holiday such as Defender of the Fatherland Day, or April 12th. Photos of various rocket crafts can be viewed on the Internet. Familiarization with several options for this type of craft will allow you to turn on your imagination and create a real masterpiece.
paper rocket
In case you do not know what a rocket can be made of, it is recommended to turn your attention to paper. The composition of paper is different in that even children over the age of five can make it. The presented product can act as a gift to relatives.

Try to make a rocket together with the children, developing the eye, visual memory, and generally getting closer to the kids.

The process of creating a paper rocket includes the following manipulations:
First of all, you need to carefully fold the paper sheet, getting a rectangle. One half of the rectangle is folded to form a cylinder.


Do not forget that the edges will need to be carefully trimmed in a circle, this is done so that in the end the design is more stable.

Taking three squares and using scissors, you need to make a porthole. If children create crafts, then you need to remind them that you need to carefully use cutting tools.

All that remains is to glue the resulting porthole to the existing cylinder. Next, you need to move on to assembling the rocket. When the bow is fixed, you can proceed to decorate the "tail" of the product.

Such a simple master class on making a rocket will allow you to personally verify that there is nothing difficult in creating such a composition.

This leads to the fact that, if desired and with the proper approach, you can always create a spaceship with your own hands, and your children will be happy to help you.


Origami rocket - beautiful and original
Such a composition really looks unusual, if you want to create it, you need to make a minimum of effort, spending a little time, not forgetting to turn on your imagination, showing your exquisite taste. We make a rocket with our own hands step by step so as not to miss a single detail.

Such a composition can be a great solution for such a holiday as Cosmonautics Day, for example, it is quite possible to perform it using the modular origami technique. Older children will be able to independently realize the presented idea.


The creation of crafts is carried out according to the following plan:
At the very beginning, you will need to prepare paper squares, each of their sides should be ten centimeters. The square is folded so that the result is two rectangles and four squares.

It is important to note here that the four corners must be carefully bent towards the center, after which the figure is turned over, the corners are bent strictly to the middle. As a result of such elementary manipulations, it is possible to create a “star in a square”.

Next, you need to insert the already created modules into each other, carefully gluing them together. At the moment when you glue the bottom row, you can stick three more rows on top, connecting the body as a whole. Do not forget that any manipulations must be carried out carefully, only then it will be possible to achieve the same composition as a result.


But you can’t imagine a rocket without a nose, so proceed to create it, there is nothing complicated here. All you need to do is roll the paper cone, it's easy and simple.

If necessary, or if desired, you can always make legs that are glued to the base of the module. By doing such simple manipulations, you can enjoy the fact that in the end you will have an original rocket.

Now you are familiar with the instructions on how to make a rocket with your own hands, and you could see for yourself that there is nothing complicated here. Therefore, helping your children, together you will be able to create a real masterpiece that can be presented to relatives, relatives, friends.

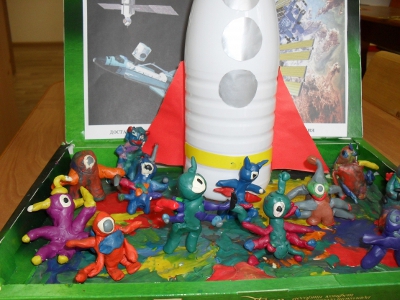
plasticine rocket
You can always make a spaceship out of plasticine. It should be noted that this option is famous for developing the baby's fine motor skills, this activity is useful both for attention and perseverance, which will definitely need to be taken into account. But in general, such an activity will definitely be able to attract children to love for creative activity.

The kids themselves must choose the block of plasticine that they like the most, rolling it on a gloss and creating a small oval. Next, the oval is transformed into a long sausage, it needs to be divided into 4 parts, since these will be the legs. To create a door, an oval is rolled up, attached to the bottom of the "homemade".


What do you need to know?
Making a rocket from improvised materials is an interesting and useful activity that children love. The main task of parents is to provide them with this opportunity, so you should treat this issue comprehensively and responsibly.

Photo crafts rockets


April 12th our entire country is celebrating the wonderful holiday "Cosmonautics Day". The children and I also carefully prepared for this national holiday. We conducted an educational integrated lesson "Day of Cosmonautics", where we conducted research activities "What is the solar system?", "What is the attraction of the earth?" space".
Target: the formation in children of senior preschool age of ideas about outer space, the solar system and its planets, space exploration by people.
Tasks:
1. Continue to expand children's understanding of the diversity of the cosmos. Tell children about interesting facts and events in space.
2. To introduce the first pilot-cosmonaut Yu.A. Gagarin.
3. Develop creative imagination, fantasy, the ability to improvise; to cultivate mutual assistance, a benevolent attitude towards each other, pride in the people of this profession, in their homeland;
4. Involve parents in joint activities.
Lesson progress:
Since ancient times, people have looked at the sky and thought about how to rise above the clouds and find out what is there. It took a lot of time until people learned how to build aircraft. And the first to fly into them were not people, but animals: rats, and then dogs. Their names are Belka and Strelka. And only after other dogs successfully flew into space, the first man went there.
Many years ago, it was on this day that cosmonaut Yuri Gagarin flew into space.
We held a series of classes, conversations, games related to space, and in conclusion we made a collective craft "Rocket flies into space".
1. First, we drew space and a rocket on a sheet
2. Then the children painted the space suits (I found space suit blanks in the coloring pages for children, downloaded, printed).

Summary: Cosmonautics Day. DIY crafts for Cosmonautics Day. Children's crafts on the theme of space
In recent years, many schools and kindergartens have begun to organize exhibitions of children's crafts on the theme of space on the eve of Cosmonautics Day. In this article we will tell you about what interesting crafts you can do with your children for this holiday. The most popular material used for crafts for Cosmonautics Day is the so-called. waste material: plastic bottles, cardboard boxes, cardboard rolls from toilet paper, parts from broken toys, etc. When making space crafts, it is also good to have a glue gun on hand.
1. Crafts for the day of cosmonautics. Flying saucers
It is very easy to make a flying saucer from plastic or paper disposable saucers. Choose plates of different diameters and depths for this craft for Cosmonautics Day.
Ready flying saucer can be wrapped in foil
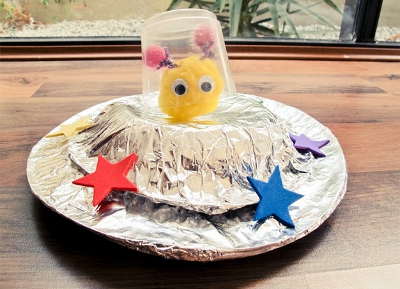
or paint with silver spray paint. Do not forget to make signal lights for the flying saucer, for example, from buttons or rhinestones.

You can also make a flying saucer from an unnecessary CD and half a kinder egg.
2. Do-it-yourself Cosmonautics Day. Starships, space stations
In this section, we will tell you about one interesting way to make DIY crafts for Cosmonautics Day. A beautiful starship or space station can be made from scrap material that you can easily find at home. Using a glue gun or double-sided tape, fasten all the details of the craft together. At the end, paint your Cosmonautics Day craft with silver spray paint. Additional details can be painted with acrylic paints.
Here is another example of a similar craft for Cosmonautics Day. The body of the space station is made from an old aquarium filter, a wheel from a typewriter, a plastic bottle, leftovers from pens and all sorts of broken toys, the wings are a cut floppy disk. Everything is spray-painted. Link .
If your craft on the theme of space, made from junk material, has few small details, then at the end you can simply wrap it with foil. See what kind of lunar rover turned out from a plastic jar and bottle caps.

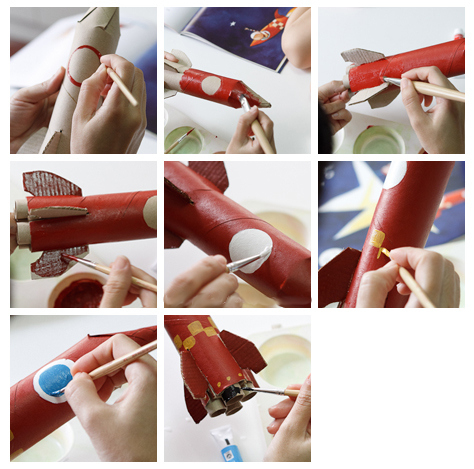
3. space crafts. How to make a rocket with your own hands
The easiest way is to make a rocket for Cosmonautics Day from a cardboard roll. In the photos below you will find a detailed master class on making this space craft with your own hands.

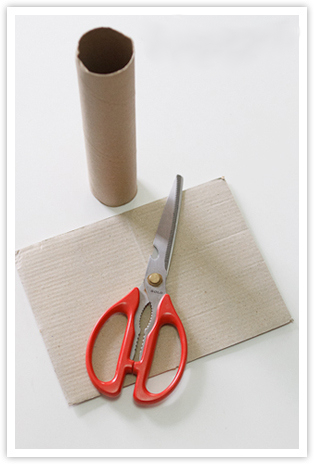
Make cuts on one side of the roll. Twist the strips in the form of a cone, glue them together.

From an additional piece of cardboard, make a stand for the rocket and engines.

Paint the rocket with paint. Space craft is ready!
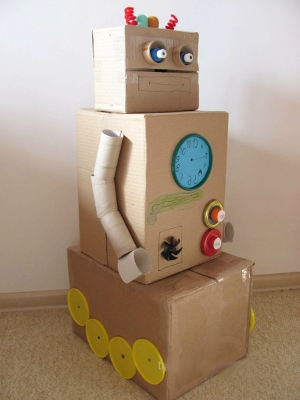
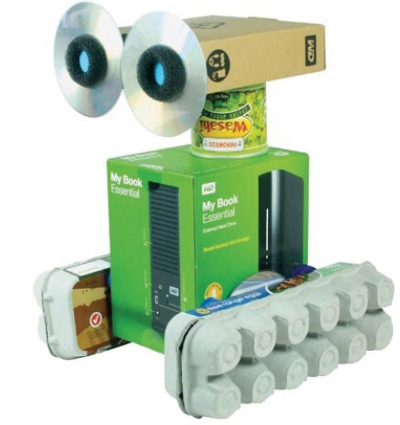
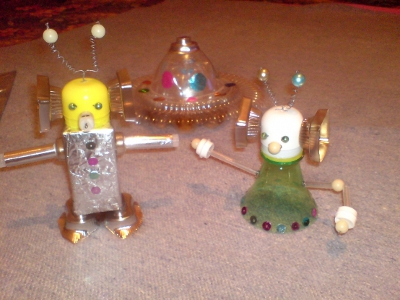
Corrugated cardboard robot. Link
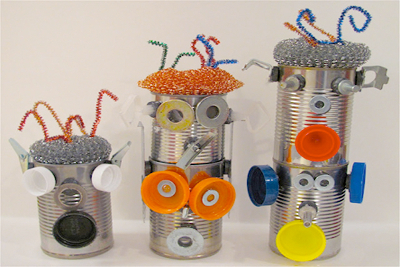
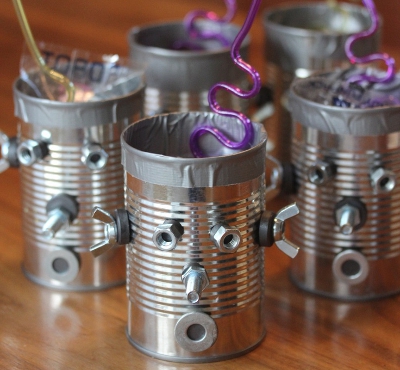
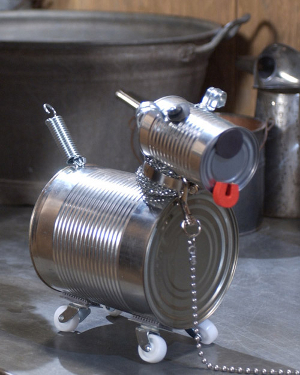
Canned robots

Robots made from cardboard boxes
5. Children's crafts on the theme of space. aliens
You can make a humanoid out of newspapers and napkins by wrapping them on the outside with foil.
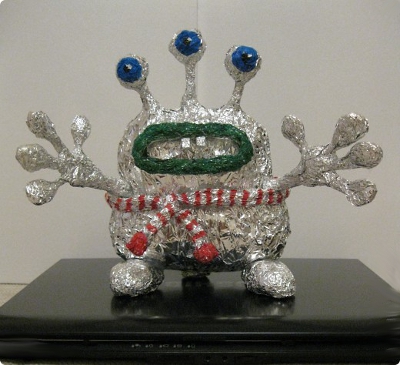
You can mold an alien from plasticine
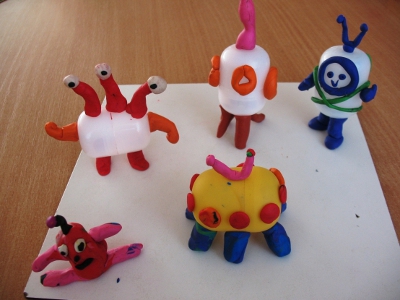
or made from waste material.
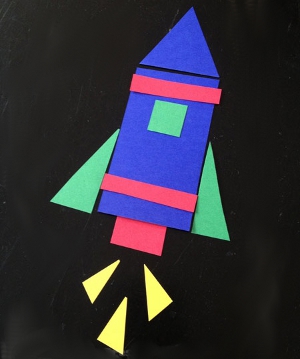
6. Crafts for the day of cosmonautics. Paper application on the theme of space
A simple craft for the day of cosmonautics for children is an application made of paper.
Geometric applique rocket
Origami paper rocket
Evgenia Smirnova
To send light into the depths of the human heart - this is the purpose of the artist
Content
You can add more variety and interesting moments to the usual everyday life of children if you master a new type of activity. To do this, you just need to captivate the baby. One of the developing and very original activities is making crafts with your own hands.
What crafts can be done on Cosmonautics Day with children

What kind of materials and ideas are not used to make crafts on the theme of Space with their own hands. Space-themed products can be made from cardboard, discs, boxes, salt dough, plastic bottles, candy wrappers, plasticine and other gizmos found at home. To decorate beautiful children's crafts for Cosmonautics Day, you just need to tell the child how to do it right.
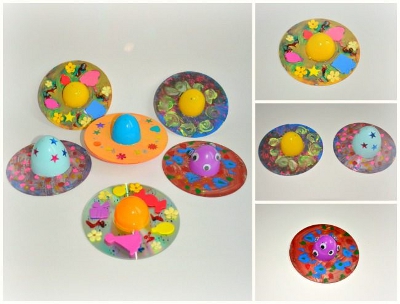
From discs
The craft "Flying Saucer" made by hand from a disk will look original and unusual. Halves from Kinder Surprise will serve as a cabin for aliens. A plastic egg can be used partially, so it will be much more convenient to fix it on a plate. Don't forget to color the flying saucer with your child, or stick on top crafts with stars, toy eyes, and other items of your choice.
From plasticine
To make an astronaut suitable for an exhibition in a kindergarten or school, you need to have plasticine of your favorite colors and imagination. Here is one of the ways how to make crafts in the form of an astronaut with your own hands:
- We roll up a ball of red plasticine - this will be a helmet.
- We turn the plasticine blue sausage and turn it into a spring. We make several spirals that will become the arms and legs of the hero of the craft - the astronaut.
- From yellow or white plasticine we form a porthole for a helmet, draw a face.
- We attach gloves and shoes made of red color to the spacesuit.
- We cut several small strips of red tone, sculpt equipment for the astronaut and attach it to the spacesuit.
There is another option for making plasticine crafts on the theme of Space:
- We roll up two balls - these will be the head and torso of the craft.
- We form ten small balls and six slightly larger ones, small ones will serve as handles, large ones will serve as legs.
- We flatten a piece of orange plasticine and attach crafts to the body. We attach three multi-colored balls to the overlay - we get the astronaut's control panel.
- We sculpt a porthole from white plasticine, edging it with a thin strip of red.
- We take black plasticine, make headphones and fix it on the helmet.

From salt dough
By Cosmonautics Day, you can bring an original craft in the form of funny aliens to kindergarten. To make your own work, take:
- multi-colored salt dough;
- toy stars, buttons and eyes;
- wire;
- stacks.
Aliens can be sculpted in different shapes and sizes, whatever your baby wants. We make antennas from wire, because what kind of alien will turn out without them? We glue small eyes on a creature from another planet, decorate the craft with buttons or stars. If the child does not come up with an image of a future alien, tell him by making an example. You can decorate an alien as you like, it all depends on the imagination of the crumbs and the idea of \u200b\u200bcrafts.
From paper or cardboard
The rocket is one of the most popular do-it-yourself space-themed crafts. To make it using the quilling technique, you will need corrugated stripes, an egg from Kinder Surprise, and PVA glue. The process of making paper crafts with children is as follows:
- We use egg halves as a template for circles.
- From the strips we wind the top of the rocket, wings, base and porthole.
- We insert an egg from Kinder into the center of the rocket, we combine all the details of the craft into a single whole.
Crafts from a plastic bottle
To make a space rocket soaring up with your own hands, you need:
- empty plastic bottle;
- cardboard;
- a pump that inflates balls;
- scotch;
- water.

The main purpose of the craft for kids is to launch it into a spectacular flight. The rocket will fall apart into small pieces, therefore, you should not be too zealous with the details. Follow the instructions:
- It is necessary to cut out the top of the craft in the shape of a cone and 3 rocket blades from cardboard.
- All received elements must be taped to the container with tape.
- After completing the previous steps, insert the pumping needle into the cork. The hole must match the diameter of the needle, otherwise water will flow out of the rocket. If they do not match, water can be poured already before starting.
- It's time to power up the pump and watch the awesome rocket flight!
Step-by-step instructions for making space-themed crafts
Cosmonautics Day is a great occasion to tell kids about outer space and make DIY crafts on the theme of Space. Any available materials will help to create an original work. It is much easier to do any craft with step-by-step instructions in front of you. Use the guide below, which details the steps on how to glue or mold popular attributes for the holiday.
How to make a flying saucer
A self-made UFO will delight the baby. To make crafts, you will need a plastic bottle with a disposable plate. Let's take action:
- With scissors or a clerical knife, carefully separate the bottom of the bottle.
- We cut off its upper part, cut off the neck.
- We put the bottom of the bottle on a plate, draw a circle with a marker.
- Cut out the circle, stepping back from the drawn borders. We make cuts.
- We insert the upper part of the bottle into the resulting hole. It will be fixed thanks to incisions.
- We fix everything with adhesive tape, we get a craft cabin.
- Insert the bottom of the bottle from below, fix it.
- Having attached the bottom of the bottle to paper or shiny cardboard, circle and cut out a circle. Insert the plate into the hole.
- We trim the edges of the plate with scissors so that they coincide with the edges of the cardboard.
- Place the top of the bottle in the middle.
- Inside the flying saucer we seat a plasticine alien - the main character of the craft.
- With the help of baking soda, vinegar and citric acid, you can make a real acid rain or a whole volcano! To do this, put a small amount of soda in a container, dilute the vinegar with water, gradually adding vinegar or citric acid to the soda. Get an indescribable spectacle!

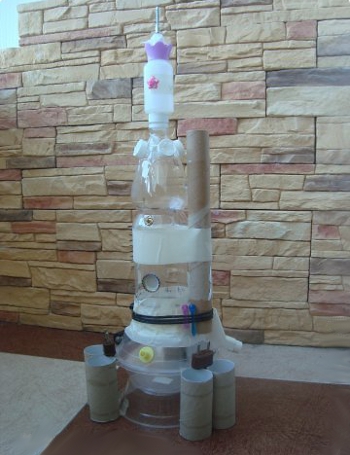
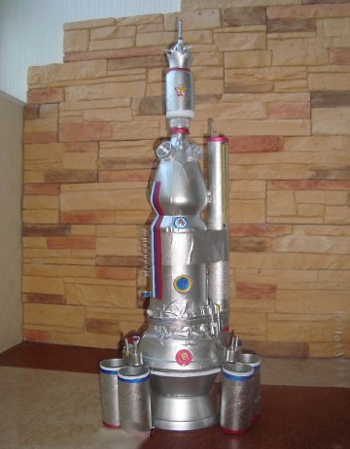
Rocket from a plastic bottle
Doing crafts on the theme of Space with your own hands is very interesting. You can make an original rocket with your child if you have:
- white acrylic paint;
- plastic rectangular bottle;
- three caps of different colors and sizes;
- two tubes of cardboard;
- thick cardboard orange, red, yellow;
- markers and pencils;
- scissors;
- hot glue.
We make the craft step by step like this:
- Pour white paint into a bottle. Shake well so that the paint evenly paints the entire inner surface. It will be less laborious if you immediately take a white bottle.
- We paint the tubes in the desired color or decorate with a pattern. From colored cardboard we make flames, glue them to the inside of the case. To make the flame develop beautifully, you can still cut it out of the newspaper. We attach the nozzles with fire to the bottle with hot glue.
- Multi-colored plastic covers will serve as portholes. We attach them to the front of the future rocket with a glue gun.
- Cut out two cardboard triangles, color with felt-tip pens, glue on both sides.
- We attach a plastic cup to the bottom of the rocket. It will serve as another nozzle and a reliable base for the rocket.
- After the glue dries, the product will be completely ready, all that remains is to come up with a name.
Plasticine planets of the solar system

By the day of Cosmonautics, it is better to do crafts on the theme of Space with your own hands. This will help the child learn a lot of new things and have fun with mom or dad. To sculpt the planets of the solar system, sculpting is easy when there is a step-by-step instruction at hand:
- We take a dense sheet and colored plasticine to create an unusual composition.
- The sun will be the central object of the craft, we begin to sculpt from it. To do this, we mix yellow, orange, white colors, but so that they can be distinguished, you do not need to make a single color.
- Glue the resulting mass in the center of the sheet, smear it with your fingers in a circle.
- To get the orbits of the planets for crafts, we roll out thin threads from white or beige plasticine.
- We create nine rings around the Sun.
- Mercury is the smallest planet. We roll it into a ball, mixing small pieces of gray, brown and white. We push the craters with a toothpick.
- We make Venus three times larger from black, brown and gray. We set the relief of the planet with a wire.
- Earth is the brightest planet in the solar system and crafts. We create it from green, blue and yellow plasticine.
- Mysterious Mars is obtained by mixing orange and black colors.
- For a large Jupiter, you will need beige, brown and orange stripes.
- We form Saturn, we attach a ring around its axis.
- We sculpt Uranus with a ring from blue shades.
- Neptune looks like an ordinary ball of blue plasticine.
- Small Pluto is obtained from gray and white.
- When finished, lay out the planets in order and attach them to the orbits in which they should be located. The process of sculpting crafts can be made even more creative if you draw a lunar rover or a comet on a sheet.
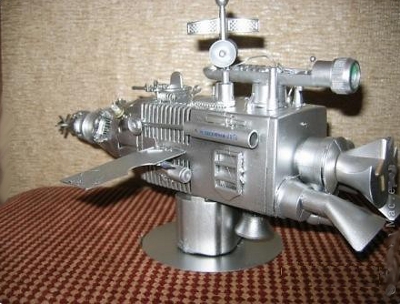
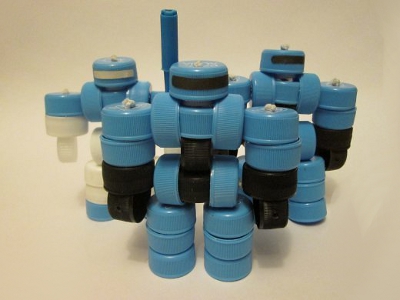
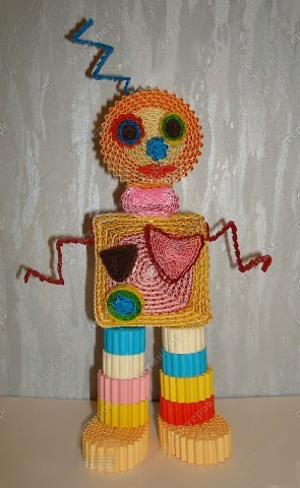
How to make a robot from improvised materials
One of the simple, but unusual, options would be a robot made of plastic caps. The way to assemble such an original product is simple.
