Such a simple boyish fun, like paper airplanes, is familiar to each of us since childhood. These exciting activities have Japanese roots, because the work with paper figures is known throughout the world as arts and crafts. origami .
Speaking specifically about aircraft, it is worth noting that with the development of military affairs and ways to create aircraft from paper, it becomes much more. If earlier the most popular way of creating was also the simplest, now boys, guys and even men are much more interested in making more complex models. In this article, we will look at various instructions, schematic photos and videos that will help you create paper airplanes of varying complexity.
simple plane
There are some easy and quick ways to create the most ordinary-looking paper plane. These diagrams and instructions will be useful for beginners.
Method number 1

We take a rectangular sheet of paper. Its density to create an airplane should be medium , since too soft or too dense a sheet can reduce the aerodynamic capabilities of the paper aircraft.
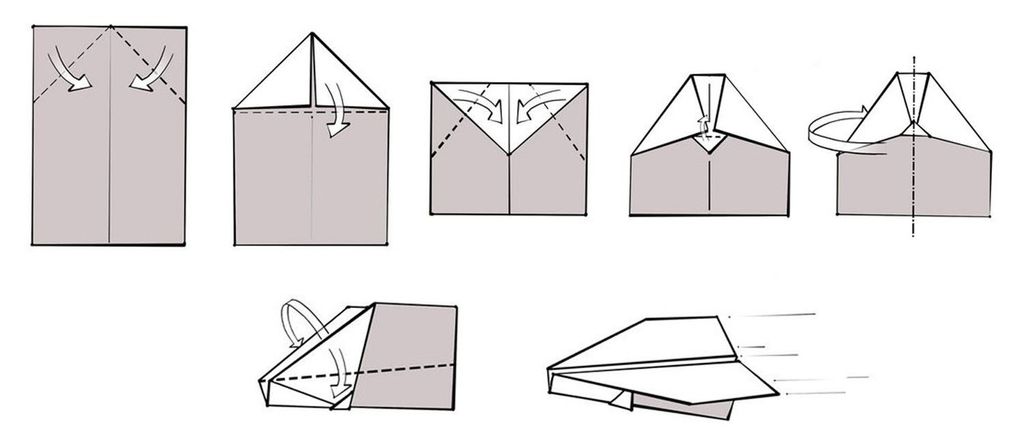
- We fold the sheet in half to make a long rectangle, outline the fold well, and then unfold it. Both upper corners need to be bent inward, along the central fold of the sheet. We bend the resulting arrow to the center of the sheet, as shown in photo 1. The result should be an envelope.
- The corners of our envelope need to be bent inward along the center line, as in photo 2 to get a triangular arrow again.
- A small triangle has formed in the center of the arrow, which can be seen on figure 3. It needs to be bent up to fix the future wings of the paper airplane.
- Again, we fold our arrow in half along the center line drawn at the beginning so that the small triangle remains outside the structure, as in 4 photos.
- Alternately, you need to bend the wings to the base of the aircraft, first from one side, then from the other - according to the dotted line on rice. 5.
- Now the wings need to be set at a right angle, as in photos 6. The result is a beautiful and uncomplicated paper plane.

Method number 2

Another option for creating a "supersonic" paper airplane is also simple and straightforward.

paper bomber plane

Here is such an interesting wide airplane you can create with your own hands using instructions and schematic drawings.
- We take a rectangular sheet, put it vertically in front of us and wrap one of the upper corners exactly along the opposite edge of the sheet so that the folded paper in shape resembles the edge of a clerical knife. We draw a fold line well and fold the paper to its original position.
- We repeat the same action for the other side: we apply the corner to the opposite side of the sheet, so that as a result it turns out that there is an X-shaped intersection from both upper edges, as shown by the red dotted line on figure 1.
- Now the resulting X-shaped intersection must be bent in the middle so that the sheet is unfolded to form a fold that is on photo 1 depicted in purple dotted line.
- After that, we fold both sharp corners inside the structure so that on the visible side of the formed arrow, the paper is seamless, as on 2 photos.
- At the end of the first stage, you need to make a fold in the center of the sheet, as shown in green on rice. one.
- The remaining rectangle is bent in the middle parallel to the base of the triangle, as in second picture, then straighten the rectangle back.
- Then you need to turn the future aircraft on the opposite, completely seamless side. We bend the upper corner towards ourselves so that it rests on the cross-shaped intersection of the folds on the rectangle, as on photo 3 and 4.
- Turn the sheet over again to the other side. We bend up two corners of our envelope to get “batman ears”, according to fifth photo.
- Turn the sheet over again and bend the diseased triangle up (6) .

- Now you need to turn the work over and pay attention to the small triangular wings, which we previously called "ears". They need to be bent in such a way as shown in rice. one.
- We bend the main upper corner along the upper fold line inward and fold the paper plane in the middle (2) .
- Now we bend the edges inside the structure, and as shown in figure 3, again fold the figure in half, and then again on itself.
- The result should be a paper plane, reminiscent of air cars from films about space battles.

A paper plane that flies far

Some paper airplane models look as close as possible to real prototypes, and therefore have impressive aerodynamic abilities. After mastering the simpler ways to create an airplane, many want to make a paper aircraft that can soar high and fly long distances. One of these aircraft can be this model, which is easy to make thanks to step-by-step instructions and schematic drawings.
- We put a rectangular sheet of paper in front of us on the surface horizontally. We bend it in half along the long side until an elongated rectangle is obtained and press the fold line well, according to rice. one.
- Open a sheet of paper and wrap the two right corners inward to make an arrow, as in photo 2.
- Without turning the corners, we bend the paper into two more corners, according to the dotted line on rice. 3.
- After that, we bend the main corner of the paper plane so that it touches the nose of the opposite side, following fourth photo. Do not forget to carefully press the fold line.
- We turn the plane over to the other side and make two corner folds, which should not be directed towards the center of the sheet, but only be at a slight angle (5) .
- Now the corner formed in the center needs to be bent towards itself, following the dotted line on rice. 6. At the same time, it is necessary to bend the main angle on the other side forward so that the paper plane finally forms a nose.

- We bend up the wings of the resulting semblance of an airplane, following photo 7.
- It is necessary to lower the wings of the aircraft sticking up along the dotted line on rice. eight.
- Now you need to bend the ends of the wings to the sides, and then spread both wings at a right angle (9) . A paper plane that flies high and far can be used for its intended purpose.

paper fighter

- Here is such a simple fighter that can be made in just a few minutes if you use these instructions.
- A rectangular sheet of paper is folded in half along the long side. (1) .
- The upper corners of the future aircraft are bent towards the center of the sheet, rice. 2.
- You need to turn the work over to the other side. We bend both side corners to the center, as on photo 3. Make sure that the upper corners do not bend, as in photo 4.
- The upper part of the square must be folded diagonally towards itself - the same 4 drawing.
- We fold the future plane in half so that the center line goes down (5) .
- We make a small fold on the paper in the center of the rectangular part, according to photos 6.

- The triangle outlined by the dotted line at this stage of work is wrapped inside the aircraft (7) .
- We form the wings by bending them at an angle of 90 °, following the dotted line on rice. eight. The result is an unusual do-it-yourself paper airplane.

Making such a paper airplane that will fly is very simple. It is important to follow the instructions provided on how to make the plane and make the curves carefully.
Any person in childhood loved to make such paper airplanes, and then launch them, and the higher the point from which the plane was launched, the more interesting the lesson was.
Assembling an airplane is not only a fascinating process, but also developing a child's fingers.

Instructions for creating an aircraft
It is worth starting with the fact that the product can be made from almost any paper.


Start with simple designs, and then smoothly move on to more complex ones:
- Position the sheet of paper so that its short side is facing you.
- Mark exactly the middle on this side.
- Fold the paper so that the top corners meet the center.
- Fold the top right down the middle.
- Bend back a small part of the triangle, in order to subsequently fold the corner of the airplane again to the middle, and fix the resulting structure with a small triangular one.
- At the end of all stages, it is necessary to bend the result in half and bend back the wings.
- The plane is ready.

To better understand how to make such an origami product, check out the step-by-step photo of a homemade aircraft.
Making a modern airplane model
When you can easily learn how to make simple airplanes, you can move on to more complex models.

One of these is the Glider, which flies very high and far, while it can maneuver well in the air:
- Fold the sheet in half.
- As in the first option, it is necessary to fold the corners of the plane to the middle.
- Imagine visually a line in the middle of the product, then make a bend in this place. It will turn out a very sharp nose of the aircraft.
- The wings of the nose must be folded in such a way that they look back a few millimeters.
- Fold the product in the center so that the reverse side becomes the inside.

The last step is to bend the wings, which can be made narrow, or vice versa - wide. By experimenting, you will learn how to make the plane more maneuverable with your own hands.

military aircraft
The next view of the aircraft model is more complex than the first two, but you shouldn't have any problems building it:
- The first item is repeated from the first model.
- Bend in the middle. Fold up the corner at the top. Repeat the action with the other side.
- As a result, you should see a detail that resembles a cross. Fold the sides together towards the center on both sides.
- You should see the horns, fold them in half, and wrap the rest of the paper inside.
- The bottom corners must be bent in the opposite direction from you.
- We fold the product in half and the plane is ready for battle.

How to make a flying paper plane?
When you get tired of making airplanes, and it will happen quite soon, but your child will not leave you behind with a request to make him a new airplane, then show him a couple of lessons on creating a simple model on his own.


It will also be possible to add a separate propeller to such an airplane, which will give some realism to your product:
- Fold the paper diagonally twice
- Fold the resulting sheet along the visual lines, which divide the diagonals into two even parts.
- Both corners must be folded back
- On both sides, fold the edges one more time so that the new part is lightly flush with the previous one.
- The edges should be folded over the received parts
- Bend one more time towards the center, and then tuck the corners inward.
- Both lower corners must be bent into the holes obtained
- For the propeller, it is necessary to cut a square sheet of paper diagonally, leaving the whole core
- Fold the propeller, all the time securing it with a thread and a needle
- The last step is important to fix the propeller on the tail of the aircraft.

How to make a model aircraft that will fly fast?
We bend the sheet in half and open it back. Now we bend the sheet across and fold the two edges to the bottom side, and then bend only half of what was bent before.

We unfold the sides that are found on the sides and bend each part to the inside. We bend a small section of the wings and bend it from the underside. In the middle, where the fold line is located, carefully seal with your fingers or with a ruler.

We bend the resulting bends so that they are parallel to our wings and the plane is ready.

Try to create your own version of the original idea of \u200b\u200bairplanes and how to make paper airplanes based on the instructions given.


Any, even the most primitive folded paper airplane, will fly perfectly if everything is done correctly and the bends are carefully made.


If the child wants something new, then you can always show him how to make a plane that will have a folded tail and flaps. Airplanes endowed with such parts fly high and very far.

These examples of creating aircraft are far from the only ones, on the Internet you can find a fairly large number of diagrams and descriptions, as well as tips that will help you make a new type of aircraft every time and delight your child.

From what you can make an airplane at home, it's up to you. Try experimenting with different materials that lend themselves to these bends and you will notice that each plane made from a different material will have a completely different flight experience.

Be symmetrical, as an error of just a couple of centimeters can throw your plane to the side, so that it will not fly or will fly, but only downward in a spiral.


The presented master class on making aircraft will help you and your child get a lot of pleasant memories and emotions. Create a whole squadron and go out into the street - let them all into the sky.

DIY aircraft photos


A paper airplane is a wonderful symbol of carelessness, childhood, and many positive memories. There is hardly a person who has never let paper fighters and bombers in the corridors or classrooms of a school. If you decide to remember your youth, brag to the younger generation, or just relieve stress, then you should definitely know how to make a paper plane so that it flies far and high. You will need several sheets of medium-weight A4 paper, the desire to assemble your own fleet, plus a little imagination.
standard aircraft
A good, reliable aircraft that glides beautifully, and also soars in the air for a long time. Lightweight and durable with a double layer of paper on the nose and a balanced center of gravity.
Lay a standard A4 sheet, fold it in half lengthwise, and then return to its original shape. Now you have an approximate median line. Bring two corners of a sheet of paper to this line - this is the future bow. Now back down from the folded edges of 1.5 - 2 cm, draw a conditional line and fold the sheet across it. Bring the upper corners of the sheet to the middle again. Bend the resulting “tongue” from the first layer of the bow over the second, thereby fixing the structure. Bend your model in half along the midline. Now you just have to bend the wings, as shown in the diagram, and your plane is ready!

Classic Fighter
The standard model of a paper fighter, known to absolutely everyone. It has proven itself with ease of execution, fast speed and range. It is on this model that more and more complex products are based.
Also, as in the first case, bend and straighten a sheet of landscape paper along, and then bring the upper corners to the middle line. You have formed, as it were, a triangle at the place where the sheet was folded. Take the corners at the base of this triangle and bring them to the midline, as shown in the figure. After that, you can turn the resulting workpiece over and fold it in half, along the longitudinal line. Now it remains only to make the wings: bring the upper corners of the paper on each side to the middle, then straighten them to an angle of 90 degrees.

supersonic aircraft
If your fleet of standard models is not enough for you, you want to make something unique, then you can opt for a more sophisticated and refined model of a supersonic fighter that can fly far and high.
Here you will need to outline the median line by bending not along, as it was before, but across a sheet of paper. Bring the corner edges of the sheet to the midline, then bend the future nose across, bringing the top of the nose to the midline in the tail. Step back from the last fold 1 - 1.5 cm, then bend the nose in the original direction, as shown in the figure. Now fold the future aircraft in half lengthwise, bend the future wings. To stabilize the flight and give the necessary aerodynamic properties on the dock edges of the wings, make a fold of paper looking up.

reconnaissance aircraft
Another rather complex, non-standard model that will delight you with unexpected aerial stunts and flight paths.
Lay the landscape sheet across in front of you. Baste two bisectors coming out of the bottom corners of the paper, then fold the sheet along them, as shown in the figure. Now do manipulations with the future nose, similar to the previous model: bring the top of the nose to the center of the tail, bend the nose again in the opposite direction, stepping back 1 - 1.5 cm. Now bend the body of the aircraft along, make wings. At the same time, the wings should be large enough, which will ensure long-term planning of the model in the air.

intercontinental liner
In 1983, American resident Ken Blackburn created a paper airplane model with which he set a world record. The plane stayed in the air for almost 30 seconds. You can also create your own aircraft. With this module, if you don’t get into the book of records, then you will definitely surprise all your friends.
Take a standard A4 sheet, lay it lengthwise in front of you. Fold its sides as shown in the picture. Carefully make sure that the bent corners do not touch each other and that a distance of 3 - 4 cm is maintained between them! Now wrap the top edge 2 cm, smooth, repeat this procedure. You need to complete 9 - 10 such folding. Now bend the future aircraft in half, bend the wings, leaving only 2-3 cm on the aircraft body. To give the appropriate aerodynamic performance, bend the outer parts of the wings up.

Now you have mastered all the secrets of how to make a paper plane so that it flies far and high, shows aerobatics and boggles the mind with its speed. If you wish, you can put a name on the wings or fuselage of an aircraft, find or print paper with all kinds of patterns that will give your crafts an extra twist.
A long time ago, when we were all little, we made paper airplanes and let them fly. It was exciting and fun to play with the paper toy. It would seem that this is an ordinary flying piece of paper. But no, to design an airplane that will last a long time and please you with long flight distances is a whole science.
The main thing in the article
What do you need for a do-it-yourself paper airplane?
To design a paper airplane with your own hands, you will need:
- 5 minutes. time
- sheet of paper A4 or A3;
- diagram with step by step instructions.
If you want to give the airplane individuality and originality, prepare paints, brushes, felt-tip pens and pencils.
Previously, they used a newspaper sheet as the main material. It had a rectangular shape and was suitable for making a paper toy.
Make a paper airplane with your child, and at the same time remember your childhood. Your child will enjoy not only launching it, but also the process of simulating an aircraft. In the process of work, children develop accuracy, concentration, motor skills of hands, perseverance and imagination.
How to make a regular paper airplane: step by step instructions for beginners

The easiest and easiest way to make a paper airplane


To make the airplane soar in the air longer, it is enough to make the ends of its wings “look” up. The dotted lines in the figure indicate the areas that need to be folded.
How to make a far-flying paper airplane: instructions with photos

- Turn the sheet towards you with the wide side and fold in half for a clear middle line.
- Bend the upper left corner to the middle of the fold, do the same with the upper right corner.
- Bend the "nose" of the airplane across so that its end coincides with the edge of the sheet.
- Step back from the top fold line 1.5 cm and bend the nasal area, pointing it up.
- Next, fold the structure in half lengthwise.
- Make the wings by placing the nose to the left of the hand and the tail to the right. Bend the top so that the nose does not break, as in the diagram.
- Make folds on the side edges of the wings so that they look up. This will give the aircraft aerodynamics and stability.
What does it take to make a paper airplane fly far?
- To make a paper airplane fly far, design narrow and long models. This design gives the aircraft rigidity, and the center of gravity, shifted to the nose, will increase the length of the flight.
- Choose spacious rooms so that the plane has a place to fly. If you run it outdoors, it is better in calm weather.
- When launching a toy, try to do it gently.
- The nose must be pointing up, otherwise the plane will fall very quickly.
- Paper weight also plays an important role. The thicker the paper, the stronger and more durable the airplane.
- The folds should be even and perfectly symmetrical.
- To make a far-flying "apparatus" take clean and smooth paper.
How to make a paper airplane with your own hands: 10 different ways with step-by-step diagrams


Show your imagination and give the airplanes a colorful look, then they will look interesting and bright.
How to make a cool paper airplane
Behind are simple instructions for building paper toys. Each of them has a unique aircraft. But how to make a cool paper airplane? Each person has their own parameters that correspond to coolness. Therefore, we offer one of the models of cool aircraft.
reconnaissance aircraft model

- Place a sheet of paper in front of you with the wide side facing you.
- Fold the top right corner, then the top left corner. The result is an isosceles triangle.
- Fold it in half, guiding the top corner towards the underside of the shape.
- Measure 1.5 cm and bend the nose of the airplane up.
- Bend the structure along the middle fold line.
- Make the wings by guiding the top corner towards the bottom fold line. Turn over and make the second wing.
- The paper airplane is ready for maneuvering flights.
military paper plane
Now try to make a more complex paper airplane. You will need:


- Place the sheet with the narrow side facing you. Draw lines on the sheet according to first diagram point.
- Bend the resulting corners inward. You will get a triangle.
- Turn the design over so that the bow is on the left hand.
- Find the middle in the triangular part of the airplane. Fold the remaining corner inside. You should get a hexagonal figure, as in the diagram in paragraph 6 .
- Fold in half, folding the bottom towards the top. Try to match all lines.
- Take a pencil and redraw the dotted lines with 7 point of the diagram on your aircraft model.
- Cut along the dotted line with scissors.
- Make wings based on 9 schema point. Bend the wing along the dotted line, pointing it down.
- Step back a distance equal to the width of the main body of the aircraft and fold the wing up.
- Bend the wing down again.
- Items 12 , 13 and 14 show exactly how to bend the wing.
- Bend the top corner first, and then the entire wing down. Turn the design over and make the second wing.
- Bend the tail along the dotted line, as in paragraph 15 .
- Military aircraft is ready to launch.
To make a military paper airplane fly far, launch it with the greatest force straight or up.
Airplane with paper propeller
For a propeller plane you will need:

- Take a square sheet of paper, fold it diagonally, then unfold it. Fold diagonally at the other corner.
- Cut a sheet of paper from four corners, but not completely. Leave the middle untouched.
- Fold each corner towards the center of the sheet.
- Fasten with a needle.
- Attach the finished propeller to the tail of the aircraft and launch.
Make an airplane from a sheet of paper: video master class
In Joanna Ferrius's tale "About the Paper Airplane," a homemade airplane, hastily folded from notebook paper, had a very specific task: to fulfill the cherished dream of its creator. But a paper plane is capable of not only granting wishes, as the legend says. A simple toy that costs nothing will lure a restless baby for a long time, developing his creativity, accuracy and motor skills. Yes, and for adults, a paper airplane will help diversify their leisure time: you can arrange a competition for flight distance or compete in the ability to fold complex airplanes. Let's figure out together how to make a paper plane!
Making an airplane out of paper
Where did paper planes come from?
The origami-made airplane, firstly, owes its origin to the history of China, where paper was invented and where origami originated - the art of folding figures from pliable material. And secondly, a paper airplane in its modern form is the tricks of quite serious aviation testing centers, where paper models of airliners and military aircraft have been used to assess the aerodynamic properties of the structure since 1930.
 origami fighter
The first to start testing aviation developments using a paper fighter were the Americans - the Lockheed Corporation concern. Later, paper airplanes spread everywhere, becoming an exciting hobby for the townsfolk of any gender and age. There were a huge number of ideas on how to make an airplane out of paper that flies. It is not difficult to fold an airplane out of a sheet of paper, but it is advisable to prefer its lighter types - loose A5 sheets (used most often) or A4 size landscape pages.
Step-by-step instruction
A lot of sources tell about how to make an airplane out of paper - more than 100 craft options are already known to origami fans. You will soon be able to master each of them, but for starters, let's use a regular sheet and 2 basic diagrams. Try to make your first plane step by step following the suggested instructions. Then you can move on to mastering complex options or developing your own model of a paper plane that flies best.
Option 1 "Airplane"
 Classic paper airplane
- Place a sheet of paper in front of you (vertically). Let's call the upper corners points A and B.;
- Bend the upper corners inward, bringing points A and B together and forming the correct pentagonal "house" from the once rectangular sheet (see Fig.);
- Wrap the upper corner of the workpiece inward, forming a square from the former pentagon, squeeze the folds of the sheet;
- Like step 2, fold inward the upper corners, but do not form the correct corner at the top (see fig.);
- Fix the structure by bending the resulting fixing corner towards you in the center of the workpiece;
- Turn the craft “face” down, and then fold the future airplane vertically inward (towards you) exactly in half;
- It remains to bend each wing towards you, giving it the desired shape and sufficient area for a successful flight;
- Straighten the paper airplane, set the desired wing angle (90° or more) and launch it by holding the craft by the fixing corner in the middle of the toy.
Option 2 "Fighter"

- Fold a vertical sheet of paper in half lengthwise, as shown in the diagram;
- Like folding the Airplane, fold in the top corners to form a 5-corner house;
- Repeat a similar folding of the sheet inward, forming an already acute-angled "house";
- The next folding of future wings inward will make the workpiece even more “sharp”;
- Turn the workpiece "face" down, and then fold the product vertically "inside out";
- Bend the wing of the aircraft on each side, it should capture the entire original length of the workpiece;
- Set the right angle to the wings of the airplane and launch it by holding the toy by its bottom.
This basic step-by-step instruction allows you to master the basics of “aircraft building” using the origami technique. A cool plane that flies 100 meters or more will not work right away - you will need to hone the skill of folding the toy. Experimenting, try to create different models (changing the angle and area of the wing, the width of the nose, etc.). Each time the toy will behave differently and its volatility will directly depend on the aerodynamic properties and correct folding.
Why do some models fly far and well, while others do not?
You can fold a simple paper airplane with your own hands in a minute, but will it properly stay in the air if made hastily? Will it not fall unsightly, and not soar gently, cutting through space? A good airplane is one that flies for a long time and glides confidently, standing firmly on the wing. But you need to fold it slowly, carefully checking the fold angles of the paper sheet and accurately setting the proportions of the toy. Far, confidently and well, only that airplane flies, in which the center of gravity is optimally balanced, the wings are the same in size and the dynamics of which are not hindered by unnecessary “corrected” bends of the sheet.
Don't know how to properly fold a toy that will proudly fly far ahead, and not fall off the flight path without starting it? Then just stick to the basic patterns of folding models, trying to improve in the accuracy of their manufacture with each new airplane. You can use small lumps of plasticine to weight the bow or unbalanced wing. Be experimental by creating a really cool plane from a simple sheet of paper. Mastered simple schemes? Then feel free to start replenishing the toy squadron using more complex options for folding paper planes using the origami technique. By the way, you can replenish your collection of paper technology not only with the air fleet, but also with the sea. For example, by folding or constructing a wonderful one with two chimneys. Well, below we give several schemes of unusual, beautiful, and most importantly, flying paper crafts: try them all, and then tell us in the comments which one flew farther!
