Technological advances have provided modern travelers with the means of navigating the terrain in abundance. All kinds of navigators, transmitters and other geolocation devices practically exclude not only the probability, but even the hypothetical possibility of getting lost. Of course, there are still unexplored corners and brave pioneers on the planet, but in most cases, outings into nature are limited only to hiking through the Crimean forests. Moreover, avid mushroom pickers, fishermen and hunters sometimes go deep into the wilds. But they also have enough electronic devices with their heads.
And only one drawback prevents them from replacing traditional orientation techniques forever: all new devices need power. Whereas the good old compass will not be discharged and will not let you down either in the forest or in the desert. In addition, it is very inexpensive (standard models), weighs little and takes up a lot of space in a backpack or pocket. All in all, an ideal device for anyone who doesn't want to get lost on a hike. It is not at all necessary to abandon the achievements of modern technology, but it will not hurt to have a compass as a safety net. And for this you first need to learn how to use it.
The device and features of the compass
The first compasses were used by the Chinese in the 20th century AD, and since then this device has undergone many changes and improvements, marine and electronic compasses have been created. But in a general sense, the concept of "compass" still means a structure consisting of a round base with markings, in the center of which there is a magnetic needle with two ends pointing to the North magnetic and South magnetic poles of the Earth. If you put such a compass on a flat horizontal surface, the arrow will be located according to the magnetic field line.
One has only to move the compass, turn it against its axis, as the arrow will move and again take a position indicating the magnetic poles. Thus, the owner of the compass always knows in which direction they are from him, and it is precisely such a compass that everyone who at least occasionally finds himself in the forest should acquire. If you already have a compass, but you have not used it for a long time, it does not hurt to check its serviceability. To do this, follow these steps:
- Place the compass on a table or on the floor - a flat surface without tilt. Wait until the arrow stops and freezes. Remember her position.
- Take any iron object (needle, scissors, steel spoon) and bring it to the compass. When a metal object approaches, the arrow will move.
- Remove the object sharply from the compass and take it away. Look at the arrow: in a working compass, it will take the same position as at the beginning of the experiment. If the direction has changed, the compass will have to be thrown away, it is broken and cannot be used.
Compass orientation in the forest
So, the compass is checked, packed with everything you need in a backpack, and you go hiking / hunting / fishing. Experienced tourists are aware of all the subtleties of handling physical equipment, and for beginners, we provide a detailed guide to action:  As you can see, it is not difficult to learn how to use a compass in the forest, especially if you have at least elementary ideas about physics and geography. But even the smartest people can make mistakes, the most common of which is turning the compass instead of turning itself. Such actions will only complicate your task, and you still have to turn around with your body to clarify the readings of the device.
It is wrong, and even dangerous, to try to navigate the terrain with a tilted compass. Its needle always tries to take a position along the magnetic lines of the planet, but if you hold the compass not horizontal, then it cannot rotate freely and even risks getting stuck. And, since the blue arrow of the compass points to the magnetic, and not the geographic pole of the Earth, this should be taken into account when using the compass at the same time as the map of the area. As well as the fact that iron ore deposits and large industrial facilities can affect the operation of the device.
In such "anomalous" zones, the compass can behave in the most unexpected way, and the arrow can start to rotate randomly. In this case, do not panic, but move back some distance and try to navigate the compass again. And make sure not to hold metal objects in your hand (a knife or a flashlight) that knock the arrow off the right direction. These elementary rules will help you not get lost in the forest and find your way back with a simple magnetic compass.
Features of using a compass to determine the cardinal points on the ground, on a map, in an apartment. Instructions for installing and correctly working with the compass on Android and IPhone.
Our attention is attracted by appliances and the benefits of civilization. And only 2-3 centuries ago, people knew more about nature and were able to navigate the terrain, based on observations and signs.
Now it is difficult to imagine a traveler or a geologist without a compass in his hands. This device helps where satellite signals are not caught and there is no Internet.
However, the compass must be handled correctly, as well as being able to interpret its measurements.
How to do this - let's talk in more detail.
The designation of the cardinal directions in English on a compass with translation
the traveler holds a compass in his hand to determine the direction of his movementSince the compass is different, their scales have a different number of marked cardinal directions.
However, the mandatory set is 4 main ones:
- N (North)
- S (South) - south
- E (East)
- W (West) - west
Or the scale shows the cardinal points in the letters of the Russian alphabet, namely the first of the words.
Where are the red and blue compass needles pointing?

 red compass needle points north
 We are used to the fact that the North Pole is located at the top of the globe, to which the blue arrow of the compass points, and the South Pole at the bottom. And the red one strives for it.
However, based on the laws of physics, it turns out the opposite. In fact, the blue arrow indicates the location of the South Pole, and the red one indicates the North. Because bodies with the same charge repel rather than attract.
Also keep in mind that the North Pole, which is familiar to us, drifts and changes its location not symmetrically to the South. Because the red compass needle really distorts the direction of this part of the world a little.
What is the azimuth in a compass and how to determine it?

 the compass is adjusted before determining the bearing
 The angle formed between the north direction and the object is called the azimuth.
The angle is measured clockwise.
There are 2 ways to determine the azimuth:
- approximate, or by eye
- accurate - with the help of a protractor
In the second case, the arrow pointing north is the "0" mark on the protractor.
How to use a compass in the forest, on the ground?

 the compass lies on the grass before determining the cardinal points and orientation on the ground
 First, check the compass is working:
- put it on a flat horizontal surface and wait for the arrow to stop
- fix its position
- bring any metal object and release the latch
- the needle should oscillate
- quickly remove the object
- if the arrow returned to its original value before the lock was removed, the compass is working
Before entering the forest, determine your direction of movement. Consider its opposite value when turning in the opposite direction.
- Attach to a large object in the area. For example, a river, power lines, a wide clearing, roads and paths. Remember that any magnetic sources must be outside the compass, otherwise its readings will be incorrect.
- Determine the bearing of this object.
- Take it into account when moving in the direction you need.
- Ideal if you have a notepad handy. Keep a record of the number of steps after each turn.
How to use a compass in an apartment?
Proceed in steps:
- study your compass, the features of its operation, check it for serviceability
- select a reference point, for example, is it a door or a window
- determine its location, being in the middle of the room
- while holding the compass strictly horizontally, for example, on a book
- lean against the wall so that a right angle forms between them
- the height of the compass in this case is at the level of your waist
- triple check your measurements and choose the average
- keep in mind that household appliances, furniture, metal objects in the apartment create a background for the compass to work correctly
- tolerances for verification measurements are 10-15%
Sometimes, in order to reduce the influence of power lines and home appliances, a compass, cardinal points are measured at a distance from the house / apartment.
How to determine your location using a compass and a map?
 compass and pencil on the map
 - If both of these items are in your hands, then first open the card and examine it carefully.
- Find the objects marked on it in the area around you.
- Rotate the map so that they match in location relative to you.
There are several ways to determine your location on the map:
- for nearby facilities
- distant
- direction of movement along the road, path, clearing
When you have completed this step, place the card on the ground.
- Place a compass on top.
- Remove it from the latch.
- Turn your face to the north, the blue arrow of the device will point to it.
- Next, check the map and the point that you have chosen as a landmark or your current location.
- Fix the direction of your movement.
How to plot a route on a map using a compass?

 compass and ruler lie on the map to determine the location
 How to download and use the compass on iPhone correctly?
 The iPhone lies on the railing with the "compass" program open next to the usual compass
 Often the compass is already installed on the iPhone among special applications. If it is not there, look in the AppStore and write "compass" in the search bar.
Choose from the drop-down list the application that you like. Or focus on the number of downloads, that is, the level of popularity of the utility.
After installing the compass application on your iPhone, to check its operation, proceed as follows:
- calibrate it. Launch the app and rotate in the air with one hand, as if drawing an infinity sign. This feature is available for iOS7. In other cases, the setting is different.
- A compass scale and an arrow pointing to the magnetic north pole will appear on the screen.
- If information about the geographic pole is important to you, go to Settings - Compass and check the box Apply True North.
- The white arrow outside the compass dial shows you the direction you are looking at at the current time. Adjust your position so that both arrows are facing north.
- Touch the screen once.
- Now, when moving, you will see a red moving zone. It shows your deviation from the fixed route. To remove it, touch the screen again.
- Combine compass data with maps. Run them. In the compass app, you will find numbers with the coordinates of your current location at the bottom of the screen. Double-tap them for extended help about your location.
How to download and correctly use the compass on Android?
To download the compass app, go to the Play Market.
- In the search bar, enter "compass" and select the application you are looking for to install. Or any that has a higher percentage of popularity and downloads.
- After downloading the application, open it and calibrate the compass. You will see a hint on your phone how to do it.
- Then study the menu and features of the application and use it as needed. Consider all the nuances discussed in the previous sections.
So, we have considered the features of the correct work with the compass as a separate device and an application for a smartphone. We learned to navigate the terrain and determine the cardinal points in the forest, apartment.
Although our age of technology makes it possible to use GPS navigators almost everywhere, however, the Internet coverage has a limited range of action.
Video: how to use a compass on the ground?
46 30 666 0
In our time, technological progress has gone far ahead, providing a person with all kinds of navigation devices that can help get out of almost any wilderness, even in distant Africa, excluding the slightest possibility of getting lost. But all these devices have a significant drawback, which does not leave classical methods of orientation in space forever in the past, namely, they all require constant recharging or, at least, changing batteries, which is quite problematic to do far from civilization. At the same time, a simple compass can fully replace all modern devices, since it does not need to be charged, it is relatively inexpensive, weighs little and takes up little space in a bag. The only caveat is the ability to use it, although here you don’t need too much knowledge.
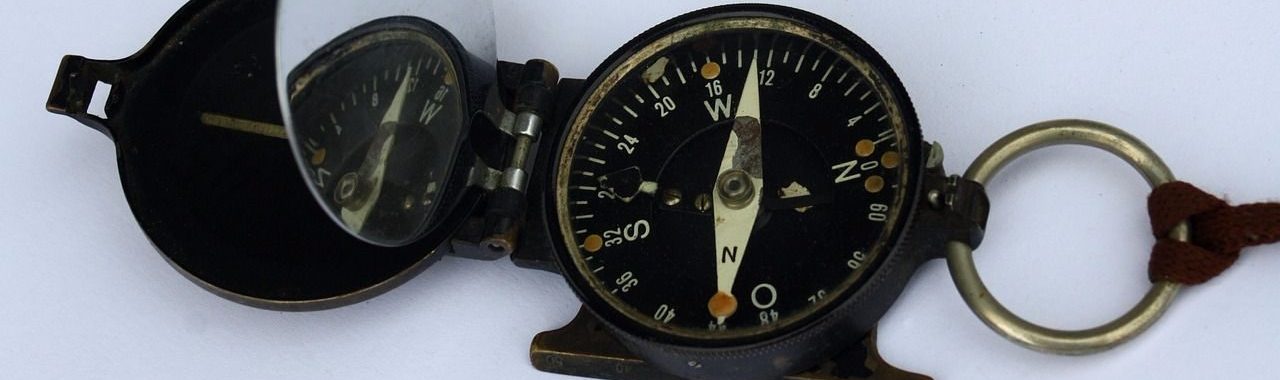
The structure of the compass
A compass is a device that makes it easier to navigate the terrain.
The researchers claim that the first compass was invented in China, and it helped to find the right direction when driving in the desert. In Europe, this device appeared in the XII-XIII centuries, but the basics of its structure have remained virtually unchanged to this day.
The most famous and easy to use is the so-called Adrianov compass, consisting of a body and a needle in the center, on which an arrow is attached. If the device is working correctly, then the arrow (often it is colored blue) shows the direction exactly to the North. The structure of the compass also includes a brake that holds the arrow to avoid malfunctions and a limb - a kind of scale that consists of internal and external digitization. The internal digitization contains divisions 0-360º, placed in a clockwise direction. The outer one is placed counterclockwise and has 10 indicators.
Types of compasses
Three fairly different types of compass have been developed in the world:
- Magnetic;
- Electronic;
- Gyro-compass
The essence of the work magnetic compass consists in the relationship of the magnetic field of the compass itself with the magnetic field of the Earth, since the compass needle, which moves in a circle, is able to be placed on the force indicators of this field. In this regard, it constantly shows a focus on the North.
Adrianov's compass is a striking example of a magnetic compass.
Gyrocompass - a mechanism that is also able to help find the correct course of movement through the terrain. The main difference between a gyrocompass and a magnetic one is the orientation of this device to the geographic North Pole, and not the magnetic one.
Work electronic compass carried out by receiving signals from the satellite, which transmits the exact coordinates of the direction of movement of the object.
Checking the performance of the device
Before leaving the house, heading into an unknown area, it is necessary to test the compass for performance, because with a faulty device you can not only get lost, but also not find your way back.
To check if your compass is working correctly, there is no need to look for any specialist.
It can be easily tested at home.
For this you need:
- Place the device horizontally on any surface and wait for the final stop of the arrow.

- Find something metallic, bring it closer to the compass and wait for the needle to move.
- Then very quickly pick up this item and, if the arrow has returned to its original place, the compass is working correctly and you can safely use it to navigate the terrain.
Using the compass in practice
How to use a compass, being, for example, in the forest?
The first step is to make the so-called "binding" to the location.
In other words, to identify a landmark - a specific object or area to which it will be necessary to return.
It is desirable that something rather extended act as a landmark, such as, for example, a clearing, a river, a road or a power line. Thanks to such a landmark, it will hardly be possible not to get to the right place when returning.
Having chosen a landmark, experts recommend moving away from it, adhering to a right angle (perpendicular) in any chosen direction.  So, having moved a little in the required direction, we become facing the chosen landmark. We put the compass on the palm in the most horizontal position, release the arrow from the brake and turn it until it is set exactly on the North (N) indicator. Further, in our thoughts, in the center of the compass, we draw the line of the chosen path - this is the line of return. Now we look at the scale, which is divided into degrees - this is the compass limb. The zero indicator corresponds to the contour pointing to the North. It is from him in the clockwise direction that the degrees are counted. We remember what degree our mental line crosses. This is the cusp point - the azimuth.
Azimuth - the value of the angle between the line indicating the northern direction, and the orientation to the landmark we have chosen.
Then we note the number located on the opposite edge of the compass and through which the represented line passes - this is the direction of our movement, which should be guided by, going deep into the thicket. Be sure to remember or write down the meaning of both numbers, and only then we begin to delve into the forest.
When returning, you must:
- Again you need to put the compass in a horizontal position.
- We put the compass in such a way that our imaginary return line passes through the middle of the device and shows the direction forward.
- Gradually turn the compass until the needle is at zero.
- Now the goal has been reached - we are looking in the direction of the direction in which we should move in order to return to our landmark.

Summer is approaching, which means outdoor recreation, walks and hikes in the forest. But while enjoying nature, we often forget about danger. To avoid possible troubles, it is necessary to be able to navigate in natural conditions and find the right path.
And the best assistant in this is the familiar compass. There are, of course, GPS navigators, but their battery life is limited, and the device itself can break from the slightest blow.
An ordinary compass is a fairly reliable device that can be bought at any sports store at a price of 100 rubles. Knowing how to use it, you can always determine in which direction you are moving and do not get lost even in an unfamiliar place.
Detailed instructions for using the compass
compass arrows
1. Since the compass needle is sensitive to metal, never use compasses embedded in metal objects (knives, etc.). Even a needle brought to the compass makes it spin. Therefore, make sure that there is nothing metallic next to the compass. Keep in mind that power lines (power lines) and railway tracks also affect the magnetic needle, so you need to move away from them by about 40 meters.
2. When using, the compass should be placed on a flat surface (for example, on the palm of your hand) and not moved. The exception is special compasses that can be used even on the run.
3. On the perimeter of the device you can see a limb - a circular scale with numbers that indicate an angle from 0 to 360 degrees.
4. Now we can find the cardinal points. A colored compass needle indicates where North is. Most often it is a red arrow, it can also be in the form of an arrow. If one arrow is blue and the other is red, then blue points to North and red to South.
North on the compass is indicated by the letter N (from the English North) or C (from the Russian North). The south is marked with the letter S (from the English South) or Yu (from the Russian South). West is W or Z, East is E or B.
If you stand facing North, then the South will be behind, West on the left, East on the right.
Sometimes this knowledge is already enough not to make one of the main mistakes of those who get lost - to go in the opposite direction from the exit.
If you entered the forest by turning off a long straight road, it is enough to remember in which direction you entered and, when returning, keep to the opposite direction.
For example, you entered the forest, moving to the North. So, to return, you need to go to the South - and you will definitely go out on your own road.
But usually we have to go not exactly to the North or, let's say, exactly to the West, but in completely different directions. And here the concept of "Azimuth" is very useful to us.
What is Azimuth
From where you are standing, mentally draw a line pointing north. Then, from the same point, draw a line along which you go forward. The angle between these lines is the Azimuth.

1. To determine the Azimuth you are on, turn the compass so that its north arrow points to the designation of the North (that is, to the zero mark on the scale or the letter N or C).
From the center of the compass, mentally draw a line along which you are moving. This line, together with the north arrow, forms an angle. This angle is the Azimuth. It is necessary to count its value from the north arrow (from the zero mark) in the direction of the clockwise movement.

You can simply look at the compass scale for the number that your imaginary line has crossed. It shows the Azimuth value.
2. If you need to follow a certain Azimuth, then position the compass so that its north arrow points to the designation of the North (zero mark on the scale or the letter N).
Then measure the desired angle (Azimuth) on the scale, counting clockwise from the zero mark (letter N), or simply find the desired number on the scale. Next, draw a mental line from the center of the compass to this number on the scale and go in that direction.
3. The bearing you are going forward is the straight bearing. To return back, you need to go in the opposite direction, that is, along the reverse Azimuth, which is calculated as follows:
if the direct Azimuth is less than 180º, then
OA=PA+180º
if the direct azimuth is more than 180º, then
OA=PA-180º
Where OA is the back Azimuth, PA is the forward Azimuth.
For example, you were walking forward in Azimuth 240º. This is the direct Azimuth. To return back, you need to go on the reverse Azimuth, which is 240º -180º \u003d 60º.
4. However, constantly doing such calculations is quite inconvenient. There is an easier way to find the back azimuth.
To do this, when returning back, you need to follow the same Azimuth along which you went forward, only now consider the southern arrow as the northern one.
That is, if you went forward along Azimuth 270º, then you also return back along Azimuth 270º, only at the same time you treat the southern arrow as if it were northern.
Example. You entered the forest moving in Azimuth 270º.
- To exit the forest, set the compass so that its south (and not north!) arrow points to the designation of the North (that is, to the zero mark on the scale or the letter N).
- Now mentally measure from the zero mark on the scale an angle of 270 º (clockwise) or simply find the number 270 on the scale.
- Then mentally draw a line from the center of the compass to that number (270 degrees). This is the direction in which you need to return back.
5. Reception, when we remember only the Azimuth of the entrance, and for the exit we go along the reverse Azimuth, it works if there is a fairly long direct landmark somewhere nearby (road, river, power lines, etc.). In this case, you only need to know the entry Azimuth. Then you can wander in any direction without remembering them, since then, moving along the reverse Azimuth, you will definitely reach your landmark, only with some shift.
Therefore, it is very useful before a trip to nature to at least glance at the map and remember such landmarks that you can later go to.
6. If there are no long straight landmarks nearby, then when moving, it is necessary to record the distance traveled in each direction. That is, memorize or record each Azimuth and the distance that you have traveled along it. To return to the starting point, you will need to follow the same path, only in reverse order.
For example, you walked first 50 meters in Azimuth 80º, then 100 meters in Azimuth 300 º . To return to your starting point, you will need to walk 100 meters in Back Azimuth 120º (300º -180º=120º) and then 50 meters in Back Azimuth 100º (180º -80º =100º). Or just turn the compass so that its south arrow points to the designation of the North (that is, to the zero mark or the letter N), measure an angle of 300o from the zero mark and walk 100 meters in this direction. Then measure from the zero mark an angle of 80º and walk 50 meters in this direction.
Distance can be measured by counting steps
True, when picking berries and mushrooms, it is quite difficult to measure and calculate the distance traveled after each turn. In such cases, you can remember (or rather write in a notebook) how many steps and in what direction you went from one clearing to another.
Having reached the place you like, you need to put some noticeable object on the ground (for example, a bright package), mark next to it the direction in which you were going (for example, with a stick), and pick berries / mushrooms, keeping this object in sight. If you want to move on, we return to this subject, measure and record the new Azimuth of movement and move on, measuring the distance.
7. It is very useful to practice working with Azimuths at home. Walk from room to room, recording the Azimuth and the distance traveled (in steps). Then try to go all the way back, focusing only on your records and determining the back Azimuth.
Then you will easily understand the meaning of Forward Azimuth, Back Azimuth and see how it works.
Calculation of azimuth from magnetic declination
There are several other important points.
1. All maps assume that North is directly up. This is the geographical North, the place where the meridians converge.
But due to the peculiarities of the Earth's magnetic field, the magnetic needle is directed not to the geographical, but to the magnetic North. It is slightly off-geographic. The magnitude of this deviation is called the magnetic declination.
If the arrow is deflected from the geographical North to the east (that is, to the right), then the declination is eastern (positive), if the arrow is deflected to the west (that is, to the left), then the declination is western (negative).
Each region has its own magnetic declination. In the Moscow area it is positive (east) and equals about +11º, in the St. Petersburg area it is about +10º, and in Irkutsk it is negative (west) and is about -3º. There are special maps and websites on the Internet where you can find out the magnetic declination in your area.
2. Azimuth calculated based on the geographical north (on the map) is the true Azimuth. Azimuth calculated from magnetic north (by compass) is the magnetic Azimuth.
When you use a compass along with a map, take this into account and adjust your movement accordingly.
For example, you plan to follow your chart in True Azimuth 30º. The magnetic declination in your area is positive +10º. So, guided by the compass, you will need to go along the magnetic Azimuth of 20º (30º -10º \u003d 20º).
Thus, with a little practice and learning how to use a compass, you can hike as far as you want, and you will feel confident in any terrain, as you can always find your way back.
Today, not every tourist knows how to use a compass. But in vain! Despite the fact that GPS navigators are understandable, practical and convenient, they have a significant disadvantage: dependence on an energy source. Those. if the battery is dead, damaged, or the navigator for some reason has ceased to determine your location, you can only rely on external landmarks (moss, stars, etc.). But it is much better to have with you such an indispensable and fairly reliable thing as a compass.
But for someone who does not know how to navigate by a compass, this tool will be useless (unless you are going to make a fire with glass). And therefore, we will give a brief and understandable instruction for orienting with a compass on the ground.
 Types of tourist compasses
To begin with, let's figure out what types of tourist compasses are.
First of all, let's recall the old and well-known Adrianov compass from the Soviet era. By the way, Adrianov is a Russian military cartographer, who, in fact, designed a compass with illumination (on a phosphorus basis) back in 1907.
The advantages of this tool is that the pointer of the arrow, the direction of the world, as well as the pointer of the sight sight are highlighted in the dark. In addition, it is quite reliable and is very popular among tourists in post-Soviet countries. The downside to using it is that the magnetic needle is unstable when moving.
 There is also an opinion that some compasses of this type are radioactive. This applies to old compasses that used radioactive elements for illumination.
In orienteering (we hold similar events as part of one- or two-day trips, follow the link so as not to miss it) liquid compasses are the most popular. Due to the fact that its internal volume is filled with liquid (kerosene, etc.), the arrow does not fluctuate when walking or running. This is quite convenient when you need to quickly navigate and reach objects.
Tablet compasses are also popular among tourists. They are convenient in that they have a ruler with a pointer and a magnifying glass. This helps you navigate the map more accurately.

In addition, you can select a keychain compass, wrist compasses, a finger compass.

But the most important thing when choosing this item, in addition to external attractiveness and ease of use, is to make sure that it is functional and serviceable.
Since the market is oversaturated with goods from China, be sure to check the compass as follows before buying. First, we check whether the direction of the magnetic needle corresponds to the geographic north. If everything is in order with this, we bring a metal object to the compass, for example, a knife. The arrow should deviate from the original position. Then we pick up the item. After that, the arrow should return to its original position without visible deviations.
All tourist compasses use the property of a magnetized needle to be located along the magnetic field lines of the Earth. At the same time, for ultra-precise orientation (for example, on ships), an amendment is made to the fact that the Earth's magnetic lines do not completely coincide with geographic meridians. And accordingly, the angle between geographic and magnetic meridians is calculated.
How to use a compass?
First, let's look at the basic terms associated with compass orientation.
Components of the Adrianov compass:
- Frame;
- Rotating sight ring;
- Magnetic needle;
- Arrow brake;
- Scale with degrees (limb);
- Front sight sight;
- Pointer readings of the sight;
- Zero division of the scale (north);
- Whole sight.

Surely, you have heard such a thing as azimuth more than once. Let's figure out what it is.
Azimuth (when orienting by compass) is the angle between the compass needle pointer, oriented north (aligned with the zero division of the scale) and the direction of some distant object.

The azimuth is counted exclusively clockwise (see the picture above).
Now let's go directly to detailed instructions on how to use the compass.
How to navigate with a compass?
So, we have a compass, a map of the area and some object on the map that we need to get to. How to use a compass and a map correctly to reach a given goal?
Remove the arrowhead. We wait until the arrow stops and the pointer shows the direction to the north. At the same time, we keep the compass in a horizontal position away from metal objects. The top of the map is always oriented to the north (left - west, right - east, bottom - south).
To determine the azimuth, we need to combine the north of the compass with the north of the map. We ourselves also become facing north. The center of the compass must be aligned with our position on the map.
In order to determine your location on the map, you need to navigate by the objects that are in your visibility zone. This will help the ability to read the map: take into account the relief (elevations, lowlands), rivers, trails and roads. For example, in front of us is a river or a road, a section that is directed to the north. We are looking for where on the map there are such areas. Or we see a mountain in the distance at a certain angle to the north (azimuth). We find, when moving the compass on the map, at what point the angle will correspond to what we see.
After we have determined our location, we select the goal that we need to reach. Align the north of the map with the north of the compass again. We combine the direction indicator on the compass (the reference pointer of the sight) with the direction to the object on the map. We rotate until the direction of the magnetic needle coincides with the north on the flask. Now you can start following the pointer on the compass, making sure that the north of the arrow is constantly aligned with the north on the bulb. Moving in a given direction, we will reach the required object.
Compass orientation without a map
Now suppose we went to the forest for mushrooms without a map, but we took the compass with us (so as not to leave crumbs along the way that birds can eat).
In order not to get lost, you need to choose a clear extended object that will serve as a guide for you. For example, it could be a road or a river. So we are on the road. From it we leave into the forest along an approximately perpendicular line. Moving away a little, but leaving the road in sight, we turn to face it. We take out the compass and bring it to an active state. Rotate it until the pointer of the arrow coincides with the zero scale. Further, in the center of the compass, we draw an imaginary line to our object (road). We fix the azimuth of our return. The opposite side of the line (the fly pointer) will show us the direction of movement into the forest. When moving deeper into the forest, it is advisable to periodically check whether we have deviated too much from the given direction.
To apply the acquired knowledge in practice, take a compass with you to the Hike to Baikal or, if you decide to go with us to Kyrgyzstan, to the mountain hike Hiking in Kyrgyzstan, Issyk-Kul.
You can create a whole chain of objects for orientation by fixing the azimuth values.
If you decide to return to a given object, we take the compass so that the line (the fly pointer) points forward. Next, turn around with the compass so that the north of the arrow coincides with the north of the scale. Now you can move in the direction where your gaze is directed.
In addition to the compass, there are other common ways to navigate the terrain. We single out among them the observation of the Sun and the North Star. How to navigate by the stars? Find the North Star (in the constellation Ursa Minor) - it is always in the north. If you need to determine the cardinal points of the Sun, you need to observe where it rises and where it sets. Accordingly, sunrise is east, and sunset is west.
More information about compasses can be gleaned from the video:
Now you know how to use the compass correctly and navigate the terrain, which means that you will not only not get lost, but will also help others get out of the forest.
