Mainly used for video calls. Often the sensors of these cameras cannot boast of high resolution and outstanding image quality. As a rule, this is enough for the majority of users, but it happens that the front camera is out of order, or a higher picture quality is required. Then the owner of the device faces the question - how to connect a webcam to a tablet?
The webcam can be connected to most tablet computers
USB connection
The question is, in fact, easily solved. First of all, it is worth finding out if your device supports the OTG protocol, which allows you to connect various USB peripherals to the tablet using an adapter - keyboards, flash drives, printers and webcams. If OTG support is available, you will need an appropriate adapter (some tablet models have it as standard).
We connect the USB camera to the tablet through an adapter (an important point is that the camera must be turned on), in most cases the gadget itself recognizes it as a flash drive, after which it only needs to be rebooted and you can start working. Some webcam models may require additional manipulations, as they require additional drivers to work correctly. In this case, go to the manufacturer's website and download the required driver.

If the manufacturer has not bothered to release software for Android (far from everyone is developing drivers for Android), this is not a reason for despair. In this case, you will need to download the Stick Mount utility from Google Play, which will solve the problem, as it allows you to mount a huge amount of all kinds of peripherals to Android devices.
Wireless connection
Unfortunately, not all devices support the OTG protocol. This does not mean that the problem has no solution. It's just that in this case, connecting the webcam to the tablet will have to be done "over the air" using wireless solutions. These include IP cameras, and rather rare models that use the Bluetooth protocol. Let's take a closer look at the first one.

In order to connect an IP camera, it must be already configured and connected to the wireless network. That is, this option will require for implementation, in addition to the camera and tablet, also a Wi-Fi router. After that, you can either use specialized software, which a fairly large number of models have, or download one of the many utilities for working with IP cameras from Google Play (one of the most popular is TinyCam Monitor). Another option is to install some kind of media player that supports streaming
Ever since the days of the Symbian operating system, smartphones can be used as a webcam. Naturally, the Android operating system also has such an opportunity. In this article, you will learn how to use an Android smartphone as a webcam by connecting it to USB or.
Step number 1. Installing the application on an Android smartphone.
In order to use an Android smartphone as a webcam via USB, you need to install a special application on it. Now there are many applications that implement this possibility. In this article, we will use DroidCam Wireless Webcam because this application is free and very simple.
Step number 2. Install the client program on the computer.

Step number 3. Turn on USB debugging on your smartphone.
If you want the image to be transferred from a smartphone to a computer via USB, then you need to enable the "USB Debugging" function. This can be done in the smartphone settings in the "Developer Options" section. You can read more about this.

If you plan to transfer the image not via USB, but via WiFi, then this step can be skipped.
Step #4 Launch the DroidCam Wireless Webcam app on your smartphone.
After enabling USB debugging, you can launch the DroidCam Wireless Webcam app. At this point, all you have to do is launch the application. No further action is required.

Step number 5. We connect the smartphone using a USB cable and run the client program on the computer.
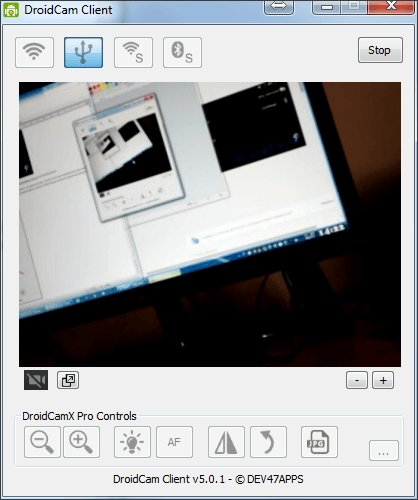
Next, we connect the smartphone using a USB cable and run the client on the computer. After that, a window similar to the one in the screenshot below should open on the computer. Here you need to select the operating mode via USB (the second button in the top row), turn on video and sound (tick video and audio) and click on the “Start” button.

After that, an image from the smartphone's camera will appear in the program window.
This completes the setup. Now you can use your Android as a webcam via USB. To make sure everything works, you can open the Skype settings.

If you want to connect your smartphone to your computer not via USB, but via Wifi, then when you start the client program, you need to select the WiFi mode and specify the IP address of the smartphone (you can find it in the DroidCam Wireless Webcam application on your smartphone).

It should also be noted that there is a paid PRO version of this application. In the paid version of the application, you can control the image (change brightness, contrast, etc.) and use 720p video resolution.


The main camera of even flagship smartphones is often not able to compare even with modern budget-class digital cameras, which is not some kind of discovery, because the size of lenses and lenses in smartphones is always almost the same, which cannot be said about ordinary cameras, so the application for android CameraFi - USB Camera / Webcam offers the ability to connect any camera to your device via USB. The only condition for connection is native (that is, system) support for the USB OTG function and the availability of an appropriate cable / adapter.
The free CameraFi - USB Camera / Webcam app provides full support for the resolution of the connected camera, i.e. if you have some kind of camera that shoots 4K video, then even after connecting to a smartphone, this option is still valid. Of course, the application allows you to adjust the resolution and quality of the video or photo, and also records the video and audio stream without any problems. For the normal detection of cameras and cameras, you will have to give some system permissions to the program, while Root rights are not required at all. All taken photos or recorded videos can be viewed on the device, while pre-assigning exactly those prefixes in the name of each file that will be to your liking.
The program's interface is no different from any other video recording program: standard buttons to start shooting, gallery, switching operating modes and going to settings. Not every camera is initially capable of connecting via USB, so in such cases, nothing more than an adapter a la HDMI - USB and the like will come to the rescue. The program will be useful not so much for entertainment when connecting the same GoPro or something like that, but for connecting, for example, microscopes / endoscopes and other things. There are few settings, all items are intuitive, it is simply impossible to turn on / off something important.
Let's summarize: CameraFi - USB Camera / Webcam Android application is one of the utilities that supports working with standard resolutions of connected cameras, while not limiting them as a video or audio stream, but the ability to save the result immediately to the device without any extra actions - this is a significant plus to the already chic functionality of the program.
Peculiarities:
Download app to capture video and photo from external USB camera - CameraFi for Android you can follow the link below.
Developer: Vault Micro, Inc.
Platform: Android 4.1 and above
Interface language: Russian (RUS)
Condition: Free (Free)
Root: Not Needed
Page 1: User Manual
T A B L E T User Manual Please read this manual before operating your device and keep it for future reference.- Page 3 Trademarks of the SD Card Association. Samsung Knox™ is Samsung’s security platform and is a mark for a Samsung device tested for Google, the Google logo, Android, the Android security with enterprise use in mind. Additional logo, Google Play, Gmail, Google Mail, Google licensing fee may be required.
Page 5: Getting Started
Getting Started Learn about your mobile device hardware, assembly procedures, and how to get started using your new device.Page 7: Back view
Back View Rear camera Simple clicker Simple clicker Speaker Speaker USB charger/ Headset jack Accessory port Headset jack: Connect an optional headset (not included). Rear camera: Take pictures and record videos. Simple clicker: These retractable circles securely attach optional covers (not included) to your device.Page 9: Charge The Battery
Caution: Use only Samsung-approved charging For a quick check of your battery level, view devices and batteries. Samsung accessories are the battery charge indicator located in the designed to maximize battery life. Using other upper-right corner of your device's display. A...Page 11: Set Up Accounts On Your Device
Google account. – or – – or – To create a new Samsung account or set up your To create a new Google Account or set up your Samsung account on your device at any time, Google Account on your device at any time, use Accounts settings.Page 13: Home Screen
Home Screen Notification icons Status bar Status icons Widget App folder Home screen indicator Apps list App shortcuts App folder: For your convenience, there are Notification icons: Displays new messages and several applications that are grouped into folders emails, notifications, available software updates, on the main home screen.Page 15: App Shortcuts
App Shortcuts Manage and Use Folders 1. From a Home screen, tap a folder to open it and You can use app shortcuts to launch an app from access the shortcuts inside. any home screen. Tap Enter folder name to enter a name for the ...Page 17: Navigation, Motions, And Gestures
Navigation, Motions, and Gestures Learn the basics for how to Drag navigate through your device, To drag, touch and hold an item, and then move it to a new location. and basics for how to customize Add a shortcut to a Home screen. screens by editing, sharing, and ...Page 19: Quick Settings
Quick Settings Quick Connect In addition to notifications, the Notification panel Search for nearby devices automatically to connect also provides quick access to device functions such to them quickly and easily. as Wi-Fi, allowing you to quickly turn them on or off. one.Page 21:
Window Controls Select an application window and tap Control in the middle of the window to display the window controls. Control Buttons Switch windows: Switch the positions of two Multi window applications. Drag and drop content: Move items between the application windows. Drag an item to share from one window to another.- Page 23 Use Google Voice Typing Instead of typing, speak your text input. To enable Google Voice Typing: 1. On the Samsung Keyboard, tap Google Voice Typing. You may need to touch and hold the Options key (left of the Space key) to find it.
Page 25: Apps List
3. Tap the app you want to enable, and tap ENABLE. The app displays again in the Apps list. Galaxy Apps: View and download For more information, see Disabled Services. Samsung apps that are optimized for use with Galaxy devices. Visit samsung.com/levant/apps/mobile/galaxyapps to learn more. Applications Apps List...
Page 26 Organize Your Apps Manage and Use Folders Apps. 1. From a Home screen, tap The Apps icons can be organized in folders and listed alphabetically or in your own custom order. 2. Tap a folder to open it and access the shortcuts inside. Page 27: Google Apps
Google Apps Enjoy these apps from Google. Google Now Google Now works in the background to Note: Certain apps require a Google Account. collect information you regularly look up Visit google.com to learn more. and organize it into convenient cards that display when you need them.Page 29:
Skype Samsung+ Use free Skype to hold video and voice Get live help, discover new features, and calls, as well as send instant messages to unlock promotions for your Samsung anyone around the world. device. Word SideSync 3.0 The Microsoft Word app provides a core...Page 31: Calendar
Calendar Manage your calendar events Share an Event and tasks. Apps > 1. From a Home screen, tap Calendar. 2. Tap an event to view it. Calendar View 3. Tap SHARE and tap a sharing format. To choose a calendar view: 4.
Page 32 Delete a Task 1. From a Home screen, tap Apps > Calendar. 2. Tap TASKS. 3. Tap the checkbox by the task to mark it as complete and remove it from the calendar. 4. To delete the task permanently, tap the task to open it, tap DELETE, and then confirm by tapping DELETE again. Page 33:
Camera Take pictures and record videos with the Camera app. Effect Gallery Record video Timer Take a picture Picture size Switch cameras Camera Shooting settings modes Camera settings: Tap to change camera settings. Take Pictures Effect: Tap to add an effect before taking a photo ...- Page 35 Reset settings: Reset the camera settings. Help: View information on using the camera. Rear camera Video stabilization: Activate anti-shake. Anti-shake helps to keep the focus steady when the camera is moving. Front camera Gesture control: Detect palm and ...
Page 37: World Clock
World Clock Timer The world clock lets you keep track of the current The timer provides a countdown timer for up to time in multiple cities around the globe. 99 hours, 59 minutes, and 59 seconds. 1. From a Home screen, tap Apps >...Page 39: Delete Contacts
Share a Contact Delete Contacts When you share a name card, the contact's You can delete a single contact or choose multiple information is sent as a vCard file (.vcf). You can delete contacts. share a vCard using Bluetooth or Wi-Fi Direct, attach 1.Page 41: Email
Email Use the Email app to view and View Your Email Accounts manage all your email accounts You can view email you receive for all accounts on in one application. the Combined view screen or you can view email accounts individually. Apps >...Page 43: Galaxy Apps
Galaxy device. To access the Samsung Galaxy Apps website: From a Home screen, tap Apps > Galaxy Apps. Note: A Samsung account is required to purchase and download apps. ApplicationsGalaxy Apps...- Page 45 Edit Images 1. While viewing an image, tap the screen once to see the image options. 2. Tap Edit to view and use the editing tools. Share Images Use one of the following methods: 1. From a Home screen, tap Apps >...
Page 47: Internet Settings
Internet Settings Saved Web Pages Saving a web page stores the web page content on These settings allow you to modify settings on your device so that you can access it offline. associated with using the Internet app. 1. From a Home screen, tap Apps >...Page 49: Music Player
Music Player Listen to your favorite songs with the Music player. Navigate through your music library, play songs, and create customized playlists. Song queue More options Sound quality and effects Playback position Volume Favorite Time elapsed Song length Playback controls Favorite: Tap to tag this song as a favorite.Page 51: My Files
My Files Access files stored on your Cloud storage: Contains shortcuts to FTP servers or other cloud storage locations that you have device, including images, videos, added. songs, and sound clips. − Google Drive: Sign in to view folders and files located in your Google Drive account.
Page 52 Category Options Shortcuts After tapping on a category, the following options When you add shortcut folders, displays on the are available: My Files screen. SEARCH: Search for a file in the selected To delete a shortcut: category. 1. From a Home screen, tap Apps >... Page 53: Video Player
Video Player Play and manage videos stored on your device. Video list File name More options Playback position Volume Time elapsed Video length Move controls Move controls Screen ratio Pop-up player Rewind Fast-forward Pause or Play Fast-forward: Tap to skip to the next video. Touch Pop-up player: Tap to open the video in the ...
Page 54 Access the Video Player Change the Video Screen Size 1. From a Home screen, tap Apps > Video. You can change the size of the video during video playback. 2. Scroll through the videos stored on your device. After a few seconds, each video thumbnail 1. Page 55: Settings
Settings Configure your device’s Some options are enabled or disabled by tapping the ON/OFF button to turn the connections and settings, option on () or off (add accounts, and customize For some options, you must tap a field, ...Page 57: Wifi Settings
Wi-Fi Settings Wi‑Fi is a term used for certain Scan and Connect to a Wi-Fi types of Wireless Local Area Network Networks (WLAN). Wi‑Fi 1. From a Home screen, tap Apps > communication requires access Settings. to a Wireless Access Point 2.Page 59:
Bluetooth Bluetooth is a short‑range Scan for Bluetooth Devices communications technology that When you want to pair with another Bluetooth allows you to connect wirelessly device, you can scan for nearby devices that are visible. to a number of Bluetooth Apps >...Page 61: Airplane Mode
Airplane Mode Airplane mode disconnects your device from all networks and turns off connectivity features, such as Wi‑Fi and Bluetooth. While in airplane mode, you can use other features, such as playing music, watching videos, and other online applications. 1. From a Home screen, tap Apps >...- Page 63 Change the Portable Hotspot Turn Off Portable Wi-Fi Hotspot Password Automatically 1. From a Home screen, tap Apps > Set your device to automatically turn off Portable Settings > Mobile Hotspot and tethering. Wi-Fi hotspot if there are no connected devices. 2.
Page 65: Mobile networks
Mobile Networks Control your device's access to networks and mobile data service. From a Home screen, tap Apps > Settings > Mobile networks for options: Data roaming: Allow your device to connect to data services while roaming. Significantly higher charges may result.Page 67: Sounds And Notifications
Sounds and Notifications Configure the sounds and Volume vibrations used to indicate Set the system volume level, and set default volume notifications, screen touches, for call ringtones, notifications, and other audio. and other activities. Tip: You can also set System volume from the Home screen by pressing the Volume key.
Page 68 Tube Amp: Simulate the soft timbre of a tube amplifier. Keyboard sound: Play a sound when the Samsung keyboard is tapped. Note: Sound effects are only available when a pair of headphones or a compatible Bluetooth headset is connected. Vibrations Set the amount of vibration for incoming calls, notifications, and haptic feedback. - Page 69 Do Not Disturb App Notifications This setting allows you to block all notifications 1. From a Home screen, tap Apps > Settings and alerts. The options below determine what > Sounds and notifications. notifications can make sounds, and during what time 2.
Page 71: Smart Stay
Smart Stay Daydream Using the front camera to detect your face, the The Daydream setting controls what the screen screen does not time out as long as you are facing displays when the device is docked (dock not the screen. included), or while charging.Page 73: Application Settings
Applications Settings Manage settings for applications Downloaded on your tablet. Displays apps you have downloaded onto your device. 1. From a Home screen, tap Apps > Application Manager Settings > Applications > Application manager. You can download and install new applications 2. Tap DOWNLOADED to view a list of all the on your device.Page 75: Default Applications
Default Applications If you have multiple applications of the same type, such as email apps, you can select one app to be the default. 1. From a Home screen, tap Apps > Settings > Applications > Default applications. 2. Your defaults are displayed. 3.Page 77:
Wallpaper Change the look of the Home and lock screens with wallpaper. You can display a favorite picture or choose from preloaded wallpapers. 1. From a Home screen, tap Apps > Settings. 2. Tap Wallpaper. 3. Tap HOME SCREEN, LOCK SCREEN, or HOME AND LOCK SCREENS.- Page 79 To access your device remotely, Change Backup Password visit findmymobile.samsung.com. You can change the backup password for your Note: You must sign up for a Samsung account and fingerprint. enable Google location service to use Find My Mobile. 1. From a Home screen, tap Apps >... Send security reports: Send security reports to Samsung via Wi-Fi for threat analysis. Other Security Settings Device Administration More security options are available. Manage your device administrators and application installation privileges.
Page 81: Credential Storage
Credential Storage Advanced Security Settings Manage your security certificates. If a certificate Use these options to configure advanced security authority (CA) certificate gets compromised or settings. for some other reason you do not trust it, you can 1. From a Home screen, tap Apps >...Page 83: Private Mode
4. Follow the prompts to learn about and set up Private mode. Report Diagnostic Info Give consent to provide diagnostic and usage data to Samsung to help improve the quality and performance of its products and services. 1. From a Home screen, tap Apps >...- Page 85 Dexterity and interaction Universal switch: Control your tablet with your customized switches. Assistant menu: Improve the device accessibility for users with reduced dexterity. Press and hold delay: Select a time interval for this action. Interaction control: Block areas of the screen ...
Page 87: Backup And Reset
You should remove account. your Google Account before shipping your device to Samsung or any other service provider for service and Restore: Use your Samsung account to before resetting the device to factory settings.Page 89: Voice Input
Voice Input Mouse/Trackpad Settings Use Google voice recognition to perform Google Configure settings for using an optional mouse or searches using spoken commands. trackpad (not included). To perform a voice search, tap in the Google 1. From a Home screen, tap Apps >...Page 91: Storage
Storage View the device memory Memory Card (SD Card) and usage, or mount, unmount, Once an optional memory card (not included) has or format an optional memory been installed in your device, the card memory displays as Total space and Available space . card (not included).
Page 92 Mount a Memory Card When you install an optional memory card, it is automatically mounted (connected to the device) and prepared for use. However, you should unmount the card without removing it from the device, you must mount it before it can be accessed. Apps >... Page 93: Accessories
Accessories Configure options when using a book cover (not included). Flip the cover open to unlock the screen when secure lock is turned off. 1. From a Home screen, tap Apps > Settings. 2. Tap Accessories > Automatic unlock to enable this feature.Page 95: Help
Help View tips and guidelines for using your device. 1. From a Home screen, tap Apps > Settings. 2. Tap Help for information about: New features Getting started Applications Settings Settings Help...
