Reading time: 7 minutes.
Space beckons with its mysteries and mystery. Let's try to understand the complex structure of the Universe using simple examples. Let's make a model of the solar system with the children and go on a journey to distant stars.
www.oyuncax.com
There are a lot of stars and planets in our universe. They are far apart, but we can even see some with the naked eye. All planets are different, and only on Earth there is life. Our Earth revolves around the Sun, and with it seven other planets. Some planets have moons. The Earth, for example, has the Moon.
A simple rhyme will help to remember all the planets of our solar system:
All the planets in order
Call any of us:
Once - Mercury,
Two - Venus,
Three - Earth,
Four is Mars.
Five - Jupiter,
Six - Saturn,
Seven - Uranus,
Behind him is Neptune.
He is eighth in line.
In order for this short story to resonate with a child's soul, we propose to make a visual layout of the solar system, guided by one of the proposed ideas.
 only-poleznoe.ru
The universe is infinite, but for convenience, let's put a part of it in a shoe box. Space in a box is easy to make, the materials are the simplest.
Remove the lid from the shoe box. Invite your child to paint the bottom and sides with the "color of the cosmos" - dark blue, black. Make stars from plasticine or colored cardboard and glue them to the walls of the space box. The most important part of the work is to blind all the planets of the solar system and the Sun itself. Help the child to attach the space objects to the strings and fix it on the top wall of the inverted box.
While we were making it, we memorized the names of the planets, tried to roughly maintain their sizes relative to each other and fix their location relative to the Sun and neighbors.
 fastory.ru
If your kid is one of those who like to study the issue thoroughly, in all the smallest details, be puzzled by the appearance of the planets. Discuss why this or that planet is of this color, what it is connected with.
 www.lassy.ru
Mercury grey . The surface is rocky with large craters.
 www.lassy.ru
Venus yellow-white. It has this color because of the dense layer of clouds of sulfuric acid.
 www.lassy.ru
Earth light blue. The oceans and atmosphere give it that hue when viewed from a distance. As you get closer, you can see browns, yellows, and greens.
 www.lassy.ru
Mars red-orange. It is rich in iron oxides, due to which the soil is colored in a characteristic color.
 www.lassy.ru
Jupiter orange with white patches. Orange is due to ammonium hydrosulfide clouds, white is ammonia clouds. There is no solid surface on Jupiter.
 www.lassy.ru
Saturn light yellow. The red clouds are covered with a thin haze of white ammonia clouds, giving the illusion of a light yellow color. There is no hard surface.
 www.lassy.ru
Uranus pale blue due to methane clouds. There is no hard surface.
 www.lassy.ru
Neptune pale blue. It is covered with methane clouds (like Uranus), but due to the distance from the Sun it seems darker. There is no hard surface.
 www.lassy.ru
Pluto light brown. Rocky surface, dirty ice methane crust give it such a shade. Sometimes they talk about it as the 9th planet of the solar system, but you should know that not so long ago it was excluded from the list of planets and attributed to dwarfs. Astronomers have substantiated the reasons for this.
 fruktoviysad.ru
The planets revolve around the sun along a certain trajectory. To explain this to a child, make a layout on a horizontal plane. Draw circles and place each planet on its own "treadmill".
 only-poleznoe.ru
You can show the approximate distance from the planets to the Sun on a layout with wooden skewers.
 spacegid.com
 twlwfiv.appspot.com
You can visualize the size of the planets and the distance to the Sun in this way. The planets are woolen balls. The sun is the top of the tree. Each planet on its own "branch".
 mamadelki.ru
 dmitrykabalevsky.ru
Here is an example of a visual aid that not only explains how everything works in the Universe, but also serves as a room decoration, an excellent decoration for.
 www.nacekomie.ru
On sale, you can also find worthwhile benefits that will clearly demonstrate the "relationships" between the planets of the solar system.
 www.nacekomie.ru
Tell us what layouts you got. We are waiting for stories and photos in the comments.
- take a dozen balloons.
- inflate them a little to make balls of the desired size of the planet.
- cover these balls with papier-mâché (the first layer is newsprint + paste (can be replaced with diluted PVA), the top layer is white paper).
- wait until everything dries (it may take a day).
- blow off the balls and take them out through the hole (you can, of course, not blow it off, but it's dangerous).
- seal the hole from the ball.
- paint with the desired colors (the earth is blue. Mars is red), draw additional elements (continents, caps on Mars, volcanoes on Venus).
- enjoy.
- balloon
- PVA glue
- newspapers
- threads, cotton wool, felt-tip pens and paints.
- a small ball, a ball, even an old Christmas tree toy will do. This will be our base.
- glue it with toilet paper, you can not particularly smoothly, as it turns out.
- now we need to decide which planet we are making. If the Earth, we will prepare green and blue colors, if Jupiter, we will not forget about the Great Red Spot, etc.
- We apply the main outlines, you can use the photographs of the planet presented on the Internet.
- Four planets (Jupiter, Saturn, Uranus and Neptune) have rings. If you make a layout of any of them, do not forget to attach rings, without it the craft will not be complete.
You can make a planet using the technique papier-mache as a basis, take, for example, an old globe, paste over half of it, then another half, then glue two semicircles together and here is a layout for you, painted accordingly and the planet is ready.
To make planets yourself, you need two things:
1 You need something round and dense enough to hold its shape under its own weight.
2 You need to know the colors of the planets and their sizes, that is, the proportions relative to each other. Astronomical images will help you with this. It is better to start creating from Jupiter, as it is the largest. If you make, for example, Mercury the size of a ball, then according to the proportions, Jupiter will have to be the size of a room or even more, so you can miscalculate.
Here is a picture to help you, roughly reflecting the proportions and colors of the planets:

How to make the planets themselves?
Options:
1 Take some plastic or rubber ball and just paint it.
2 Take the ball, and pasting it, make a ball of papier-mâché. Then carefully cut the paper ball in half (carefully so as not to pierce the ball itself). Remove two halves. Paint them with oil paint on the outside for a look and glue on the inside for durability. Then glue them together. The disc for Saturn can be made by cutting a circle with a hole out of some material, such as cardboard, and then painting it with oil paint.
To put it simply, in order to make a craft Planetsquot ;, we need to make a papier-mâché round shape (if the object is solid, then the finished papier-mâché will need to be cut and then glued; and if a balloon was taken as the basis, then pierce it and remove it through the hole left in advance). Then the papier-mache is processed in the traditional way, that is, it is decorated (like the planets in our case) and, if necessary, covered with drying oil.
There is also such an example of how you can make ** an entire solar system. **
To do this, we make a ball of paper

soak in water

cover with toilet paper and back into the water


we roll in our hands, such a ball and set to dry on a battery or with a hairdryer

We proceed to the manufacture of the solar system, berm plywood and make a circle, paint with paint

draw stars

paint our circles and attach to plywood


here it is done!!
My son made beautiful planets from plasticine. To do this, you just need to take the colors that match the color of this planet and roll a ball out of it. You just need to keep track of the dimensions so that the ratios match. Then he made a cone-shaped coaster out of paper and planted these planets on them. At the end, he arranged them as they should be one after another. If you want this model to be preserved for a long time, then you can buy polymer clay (or plastic) for this. In my opinion, for a kindergarten it will be easier than papier-mâché.
I would also do it in papier-mâché technique. but the globe, I think it's hard to find. but some other spherical object - for example - the ceiling will fit perfectly. I even took a motorcycle helmet for pasting.
We make the planet Saturn using papier-mâché technique. this is a wonderful craft of the planet on the theme of the Cosmonautics Day competition in kindergarten. We take the following materials:
We take a balloon, inflate it, tie it up, put it on a stand and start pasting it with newspaper using the papier-mâché technique.


Then we dry the ball, the more layers the planet has, the longer the ball dries :)
And now with the help of a needle we pierce and remove the ball.

And now we are making a ring for the planet Saturn, in size it should fit snugly on our ball. We paint the planet Saturn itself with yellow-orange paints.
Cut out a ring from cardboard.

Saturn is ready :)
Approaching cosmonautics day and to celebrate it on April 12, to congratulate someone, to remember, to put a piece of your creativity into under the tree let's do something do it yourself, for example, planet from space.
Except Saturn, from an inflatable ball you can make planet with craters, or planet earth.
You will need a balloon, newspapers, or white paper, PVA glue. An inflatable ball is placed on something to make it comfortable and pasted over with newspaper or paper, which are torn into pieces and the ball is pasted over with them. If the ball is pasted over with newspaper, and not with white paper, then it must be painted with white paint. Leave to dry in a warm place.

The more newspapers we paste, the denser the layer, the thicker the walls of the future planet.

The glue only dries up, we pierce the ball with a needle where it has a tail, and it descends, carefully pull it out from the inside, and glue the hole again. There we glue the thread - it will be holderquot ;.

Now, from pieces of a twisted newspaper, which we fold into a circlequot ;, we glue it to our ball, we make craters. After gluing each newspaper folded into a circle depicting a crater, we then decorate everything with paint. It turned out planet With craters.

And the planet Earth is the easiest to make. Our ball will be painted, respectively, with different colors, depicting the oceans, continents.

Having made several planets, they can be hung on strings in the nursery, you get a whole planetarium - planets in space. You can hang them on a lamp and turn off the light to see all the planets.

planets from papier mache.

All that is required for work - inflatable balloons, water, flour.

Mix flour and water.

The newspaper is cut into rectangular pieces of arbitrary size.

The ball is pasted over with a newspaper in three layers, sequentially, allowing each layer to dry.

You can dry the balls covered with newspaper, for example, in the oven.


After drying, we prime the balls, they become white.

We paint using acrylic paints.


Over paints - acrylic transparent varnish.


The layout of the planet is easy to make. For this you need:
To make it easier for a child to learn school material, there are visual aids. And in order to learn to think on a “universal scale”, the universe must fit on his desk. And this is a great opportunity to show your creative abilities and, together with your child, make a model of the solar system with your own hands.
The joint creativity of parents and children always has a beneficial effect on friendly and trusting relations between them. And in this case, it also has a cognitive goal that will broaden the horizons of not only the child, but also the adult. Our solar system consists of the Sun and nine planets with their satellites.
These are Mercury, Venus, Earth, Mars, Jupiter, Saturn, Uranus, Neptune, Pluto. They have different sizes, colors and at different distances from the Sun. This must be taken into account when making a model of the solar system.
In the layout, we simulate only the planets, but if you wish, you can also designate their satellites. To observe the size of the planets in relation to each other, you can focus on the photo:
Infinite universe of crafts
So how do you make a solar system mockup for kids at minimal cost? There are several ways.
The most primitive model of the solar system can be made from plasticine or salt dough, painted in the desired colors. It is suitable for the little ones.

This model will give the child an idea that all the planets revolve around the sun, about their number.
- we blind the orange sun;
- brown-orange Mercury;
- in the same color we sculpt Venus;
- blue and green will be the Earth;
- black and red Mars;
- Jupiter will be brown;
- Saturn is blind with rings;
- Uranus will be of blue + gray mass;
- We sculpt Neptune from blue;
- gray Pluto.
We string all the "planets" on wooden skewers and attach them to the "Sun". For greater clarity, skewers can be made in different lengths. Ready.
A model of plasticine can be made on a plane:


As a gift for a small schoolchild, you can make a model of the solar system from papier-mâché.
Papier-mache (translated from French - “chewed paper”) is a plastic mass made on the basis of paper, with the addition of binders and adhesives (starch, gypsum, glue).
The paper layout is the simplest and most affordable in execution. A detailed master class with a photo will help in its manufacture.
Materials for work:
- newspaper;
- gray toilet paper;
- stationery glue;
- plywood sheet;
- colored gouache paints;
- quick-drying blue paint;
- some silver beads.
We make a lump of newspaper soaked in water.

We wrap it with toilet paper and roll this lump into a bun. Lubricate the paper ball with glue, evenly distributing it over the surface.
Leave the balls to dry at room temperature or on a battery.

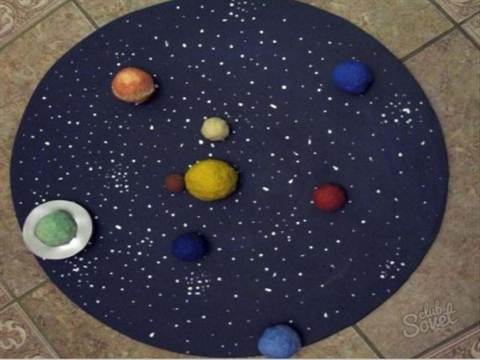
While the parts are drying, we will prepare the basis of the layout: we cut out a circle of the required size from plywood, taking into account the size of the prepared planets. Paint it blue.
We make scatterings of stars from silver-colored beads, evenly distributing it on a circle, according to the picture of the starry sky.

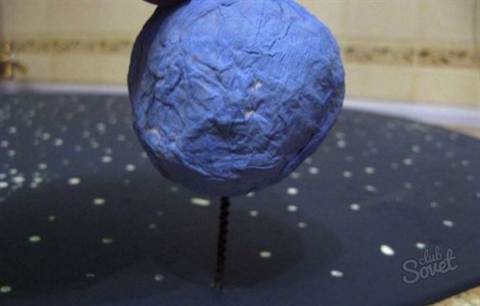
We paint the dried koloboks, imitating the color of the planets.

We will make the rings of Saturn from silver paper.

Be sure to accurately position the planets in relation to the Sun.

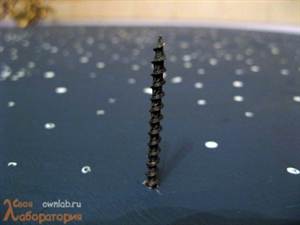
We screw the screws from the bottom of the plywood, according to the location of the planets.
We wind our “planets” on top of them.
Our model of the solar system is ready.
During the manufacturing process, you can tell your child about the structure of the solar system, about the planets and about everything that will be interesting to him. And such a gift will acquire special meaning for him.
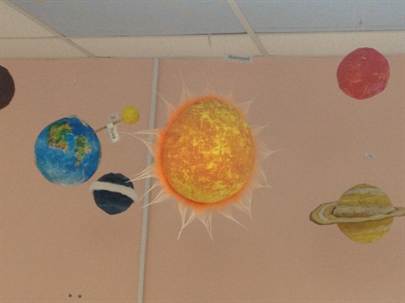
A wonderful idea to create a model of the solar system as an element of the interior of a children's room.
To begin with, we make out part of the ceiling as a starry sky.

We make planets from papier-mâché as described above.

We paint them with acrylic paints. It is more effective to use glossy ones.


We pay a little more attention to the sun. We color and make rays from a strip of faux fur.


We fasten the fishing line to the “planets” and fasten it with paper clips or a stapler to the ceiling, observing the order in which they are located from the “Sun”.

Simple memos
Sometimes it is difficult for children to remember the names of objects that they do not often encounter in everyday life. To make it easier for them to memorize, adults come up with special rhymes in which the first letter of the word matches the first letter of the name of the subject to be remembered. Such rhymes are called mnemonic.
Probably, many in childhood learned the names and order of the colors of the rainbow according to the phrase "Every Hunter Wants to Know Where the Pheasant Sits."
To memorize the names and order of the planets in the solar system, children's poems and funny phrases were also invented. You can learn a poem by Arkady Khait with your child.
How interesting it is for children to learn the topic of the unknown space. At the lessons of astronomy or visiting the planetarium, children get acquainted with the structure of the solar system. At home, such activities can also be continued and even a small model of this piece of the Universe can be modeled. In this lesson, we will fantasize with you on the topic of sculpting objects of the solar system. To begin with, we should remember what the solar system is. This is the central object - the Sun, which orients eight planets around itself. So, let's start listing and sculpting them in order.
To sculpt the Sun and planets, we need:
- a set of plasticine;
- matches.
1. Take a set of quality plasticine to work with. It is immediately impossible to find out what specific colors of plasticine we will need. In the process of work, you can look at the drawing of the solar system and create.

3. Mercury is closest to the Sun - a small planet of the same fiery color. To create a ball, mix orange plasticine with a little brown.

4. To sculpt an aggressive Venus, you will also need a mixture of orange and brown, but in this case there should be more of the second color.


6. Stick the cake on the blue ball and roll out (smooth) the surface of the plasticine.

7. Make a small but militant Mars with a red and black mixture.

8. Prepare a large brown ball and beige hairs to create Jupiter.

9. This planet is the largest due to the unusual gaseous atmosphere. Stick on beige stripes and still draw rings in a stack to give a distinctive look.

10. Brown Saturn should have a skirt-shaped dust ring.

11. Uranium can be made from a blue-gray mass.

12. Neptune must be blue.

13. All the planets of the solar system are ready. Now it remains to study space. And to assemble a single model, attach all the planets to the Sun on matches.


We had such an interesting astronomical modeling lesson.
If you find an error, please highlight a piece of text and click Ctrl+Enter.
In contact with
Classmates
I saved this project on my blog specifically so that later, in a calm environment, I could figure it out and make a similar model of the solar system for my grandchildren. It makes life a little more difficult that I do not have the CNC machine that the author of the project used. But I'll think of something.


Show All Products
This project explores the use of plywood to make mechanical, decorative and structural pieces.
This is an instructable on how to build a desktop model of the solar system. The planetarium is a mechanical model of the movement and arrangement of the planets in our solar system. The device accurately depicts where the earth is relative to other planets, the sun and moon, and how they move relative to each other. It can be used for education, decoration, display, gift, and interesting project to build.
I built my solar system model with half a sheet of plywood and less than $50 in other materials.
However, for full disclosure, the construction of a planetarium requires some specialized tools. My design does not require a CNC machine to cut gears from plywood. A laser cutter or 3D printer might also work here, but I don't know enough about them to be sure. I'm sure someone in the comments will correct me if I'm wrong.
The design relies on the custom of cut gears, which must be perfectly centered, symmetrical and have identical teeth. I would strongly recommend that you do not try this with non-computerized tools. Unless you're like Michael Phelps from the jigsaw, it's fine cutting 19 small gears with nearly 900 total teeth, probably more horrendous than it could be. Even small imperfections in gear cutting can cause problems because the gears all need to work together. Saturn moves in a pattern, for example, it takes 12 gears to all move together perfectly.
Step 1: Tools and Materials

Show All Products
I'll start by talking about the tools and materials I used:
Tools
- CNC or laser cutter
- Small set of files
- soldering iron
- Pipe/pipe cutter (hacksaw probably work here)
- Drill or drilling machine
materials
- 3/16 inch plywood (which is actually like 0.19 inch thick) - 2 feet by 4 feet section [<$10]
- Brass tubes and rods (3 leg sections) - Found these at a local art store, I've also seen displays at some hardware stores and you can of course order them online [$25 total]
- 2 x brass rod 3/32
- ⅛ inch brass tube
- Brass tube 5/32 inch diameter
- 3/16" brass tube
- 7/32" brass tube
- Brass tube 1/4 inch diameter
- 9/32" brass tube
- Washers [$2]
- Super glue
- Balls, wooden balls, plastic models, or whatever you want your planets to be
- Wooden Golf TiS (again, optional depending on the planets)
- dow rods (you can replace some of the brass window pipes here)
- Stain or paint (optional, depending on how you want it to look)
Step 2: Design


Show All Products
I started by hitting the internet hard and seeing what had already been done. Orreries come in all shapes, sizes, brands, patterns and designs. Some take up entire rooms; some of them can fit on the desktop. They can be made from anything from Lego to steel, but are most commonly made from brass. They also range wildly in difficulty. If you want to make something smaller and less complicated consider just making a model of the sun, moon and earth. There are tons of ideas and designs out there, so be creative when making your own.
I decided to build the mine out of plywood because it was a material that was easy to work with with the tools I had on hand. Because the parts are mechanical, I avoided real wood, because I was concerned about creating pain points on the gear teeth when they didn't match the wood grain, and I wanted to avoid even the slightest post-production distortion that real wood can bring. Any buckling would throw the gears out of alignment. Plywood is also relatively inexpensive, so I could experiment with a bunch of designs and drop the ones that didn't work.
Proportionality
In general, the idea of a planetarium is for him a model of the mutual arrangement of the planets and the sun. I also wanted to include Earth's Moon because it's easily observable. I had to be realistic about how accurate and complete it could be to give limits on size and buildability.
I thought that the model can be proportional in three ways:
Orbital period - all planets revolve around the sun in the same direction (relative to the sun) on approximately the same plane. The amount of time it takes them to go around the sun varies by planet. For land, it takes 365 days. The orbital period of a planet (or planetary year) increases exponentially as it moves away from the sun. Each time the earth revolves around the sun, Mercury has to go around about 4 times. Saturn only goes about 12 degrees at this time. I decided that it's not worth representing any planet farther from the sun than Saturn because they will barely move. That is, they have very small angular velocities that are difficult to observe in a planetarium. Just showing the first six planets captures most of the variation. For example, for every rotation of the Earth (or ~4 rotations of Mercury), Uranus will only move 4 degrees. Neptune will move a barely noticeable 2 degrees. I decided to just make the first 6 planets. Unfortunately, Neptune and Uranus (possibly the mysterious ninth planet, which may or may not exist. - https://student.societyforscience.org/article/bey...)
The size of the planet I quickly found I couldn't make planets and suns proportional in size to each other. Even if I made the moon the size of a pinhead, the sun would have to be a beach ball. Instead, I decided to have them presented in the size of the order, but not proportionally. The sun will be the largest object, but not as large as it should be. The moon, the smallest, but not as small as it should be. I still wanted this size difference to show up, so I did end up carving out the relative size of all the planets in the solar system inside the largest gear, more on that further down.
planet distance- Like Planet Size, a planetarium needs to be gigantic to represent the distance between the planets correctly, so I decided to just have them in the right order and that would be enough.
completeness
In addition to being not entirely accurate, the model is also not entirely complete.
Lun- I also choose not to depict any satellites, except for the Earth. Saturn and Jupiter together are over 100 and that would be a quick piling up of things. There are also asteroids, dwarf planets, and a whole bunch of other things floating around, but none of them are represented in the model.
Axial rotation - I also choose not to depict any axial rotation, that is, the planets do not rotate on their axis. I only considered having ground spin, but the 1/365 gear ratio was very intimidating. If anyone has ideas for an easy way to include axial rotation, I'd love to hear about them in the comments.
Step 3: Gears


Show All Products
To start designing gears. Gears, the heart of the planetarium. The gears must have specific tooth ratios to ensure the planets are moving at the correct speed relative to each other.
For each gear, you need to know the number of teeth (which is proportional to its diameter) and the size of the shaft at the center of the gear. All gears should be the same thickness, plywood thickness.
For the gears, I changed the design found at http://brassorrery.blogspot.com/. The blogger was limited to brass gears being on sale. Since I have been cutting my own plywood gears, they can be any size and contain any number of teeth. Therefore, I could make the model more accurate. I used Excel to find combinations of gears that (a) were within the size range I could cut from my material and (b) accurately showed planetary speeds within 1% of the error.
I used 19 gears with the following number of teeth:
- 16 (x2)
- 40 (x3)
- 46 (x2)
*In size, 146-tooth gears, I've etched the months of the year around a circle. Note that the months must be counter-clockwise. I mixed it up the first time and put them in clockwise direction which is not accurate.
In the center of each gear, you will need a hole that will fit your pending brass tube. See the diagram which shows which gears have common axles. The solid lines connecting the gears show that they share a common axle. The hollow lines show that the trunnions fit into each other and should be able to rotate independently of each other.
- With 74, 57, 46, and 32-tooth gears you need to fit on the same plug.
- The 15 and 30 tooth gears also need to fit on the same plug.
- Two pairs of 16 and 40 gears must have the same shaft diameter.
- The latest 40-tooth gears need a shaft that fits into one of the 16 and 40-tooth pairs.
- The 18, 35, 46, 146, 60, 61, and 76 gears all need different gears and bigger plugs because they will slide into each other in that order and need to rotate independently of each other.
- The 11-tooth gears can have any tube size.
Spends some time figuring out which gears will use which tubes.
To determine the gears’ overall diameter, the only consideration was that the largest gear (146 teeth) should be approximately the diameter of the earth’s axis of rotation path. The sun, Mercury, Venus and the moon all had to fit into this path. I lined up my marble planets in an interval that looked good and found that they all fit into circles about 9 inches in diameter with the sun at the center and the earth at the outskirts. The gear that the earth rotated against was 146 teeth, so the 9 inch/146 teeth became the proportion I used to calculate the size of all other gears. (X teeth)*(9/146) = Y inches in diameter.
To make the gears, I used the following steps:
- Compose each gear in a gear generator (http://geargenerator.com/)
- Click "export as SVG file"
- Import SVG files into CNC program (or laser cutter and 3D printer)
- Scale its proper diameter according to the tooth/diameter ratio (for me, multiply the teeth by 9/146),
- Add a shaft hole of the appropriate size to the exact medium
- Start the machine to cut plywood
- Use small files to clean up the chop Since the earth will revolve around a 146-tooth gear every year, I've added a few more months of it as a starting point. I also cut the circles in this gear in relation to the size of the planet because I wanted it to be represented somewhere, even if just decorative. The whole gear is the relative dimensions of Jupiter. The ring inside the month labels are the relative sizes of Saturn. The three big notches are the relative sizes of Neptune and Uranus (they are very similar in size). Three sets of four cutouts are the relative sizes of Earth, Mars, Venus, and Mercury. I painted all of my gears to make them look smaller, like cheap plywood. Some plywoods don't take stain well because they are a combination of different materials that absorb stain differently. Consider paint or test your stains before using it for the cut pieces.
Step 4: top and bottom plates


Show All Products
Almost all gears (except for 146 and 11 teeth) are sandwiched between the upper and lower plates. These plates play several roles:
- The bottom plate acts as the base for the planetarium. Later, I put a cork shelf liner under the shafts to protect the surface it sits on.
- Both plates hold all axes in position. Gears should be in a secluded place. Close enough to what the mesh teeth are, but not so close that they bind. Finding that point can be a little tricky, so take your time and try a few things. For me, I found the distance between the axles should be equal to the sum of the radii of the gears minus 0.125 inches. At that distance, the gears went very smoothly.
- Both plates hold the vertical supports in position. I cut out six dow rods to act as vertical supports, but you can use brass tubing just as effectively. These supports keep the cymbals too close together and prevent the axis from spinning freely. They also prevent the cymbals from getting too far apart and allowing the axle to fall out of vertical alignment.
I machined the top and bottom plates on the CNC. Started with the bottom plate. I found the distance between each of the axles, and I machined the 0.1 inch clearances at the top and bottom where the five shafts would fit in to make sure they stayed in place and were perfectly vertical. I also indented 6 wooden windows in a circle.
For the top plate, I used the same cnc file with four changes.
- The underside of the top plate will be a mirror image of the top of the bottom plate. So I clicked the coordinates.
- The center of the axis should have holes all the way through large enough to accommodate the pipes that govern the planets
- I made the top plate smaller than the diameter of the bottom plate because I thought it looked good and it allowed some of the gears to stick out and be more visible
- I also put some decorative cutout circles in the top plate to make the inner gears more visible.
Step 5: Brace


Show All Products
The spacer plate is an odd but necessary part of a planetarium. Its purpose is to prevent the 146-tooth gear from spinning. That the gearbox must remain stationary. A brace holds the tube that the 146-tooth gear is mounted on.
To make the take, I used the same file as the top plate with a few changes:
- The center of the hole must be exactly the same diameter as the hole in the center of the 146-tooth gear.
- Instead of indents for axles and vertical supports, the brace requires holes all the way through the material because all the trunnions run through the brace. They can be in the same place and the same size as the notches on the top plate though.
- I changed the decorative design of the circle.
Step 6: Lever Assembly


Show All Products
Now you should have all the pieces of plywood cut out:
- 19 gears
- Top plate
- bottom plate
- Double
With all these details, you can proceed to the installation of the main part of the planetarium.
First, you will need to cut the brass rods and pipes to the correct length. To calculate the length of each rod, look at the diagram to see what rod or tube needs to go all the way, then add all the thicknesses of those materials together. For my materials:
- 0.11 inch for the top and bottom of the slab
- 0.056" for each washer (the washer goes above and below each gear)
- 0.193 inch for each gear and shackle
For example, the length of my four axles (from the setback in the bottom plate to the setback in the top plate) was 2.268 inches. These are 7 layers of gears, 1 brace, 2 offsets, and 9 washers.
All pipes must end in that top plate except for the plugs that hold the planets, they must pass through the top plate. Rods and pipes that run through the center of the top plate must be long enough to not only protrude through the top of the top plate, and also continue on each irradiated 0.5 inch of brass. You can see in the photo how these plug sockets look like the good old days of a telescope if done right. Mercury, for example, will be a plug that extends from an 18 tooth gear, through 6 other layers of gears, through the top plate, through half-inch sections for Saturn, Jupiter, Mars, brace, Earth, and Venus, and another 0.5 inch of exposed brass .
Cut the bars to size using the pipe cutter. Use a small round file to make a smooth cut with a smaller diameter tube that will rotate freely in the tube.
Add gears and cut the rods according to the diagram.
Important : Don't forget to put brass washers around the axle under each gear. The washer will reduce friction between gears spinning at different speeds or reduce friction between plates of stationary and rotating machinery. Even on gears that rotate at the same speed, the washer will maintain the proper distance. A little bit of grease between the brass tubes will also help the tubes that sit inside one another to rotate freely.
Although the holes in the center of the gear were the exact diameter of the tube and a tight fit, I used a few drops of super glue to make sure the tubes rotated with the gears they were attached to.
Start installation from the bottom.
The sun does not need gears, because it is a reference point and stationary. The mine is located on top of a 3/32” rod in the center. This rod must be lowered into the notch in the base plate.
The first four planets (Mercury, Venus, Earth and Mars) are the simplest mechanically. The planets are driven by an accumulation of a set of drive gears on a common axle that sit on a washer that sits on a base plate. This folded set of gears drive rotation, but they don't move relative to each other. They have the same angular velocity. These drives are articulated with planetary gears that also sit on a washer that sits on a base plate. Each planet has its own gears and axle that move independently of the other planets. The smallest bridge, Mercury, fits inside the axis for Venus, which fits inside the axis for Earth, etc., etc.
On the bottom of the gear drive stack, the 74-tooth gear drives onto an 18-tooth gear that is connected to the Mercury Bridge. Second from the bottom, a 57-tooth gear drives a 35-tooth gear that is connected to the Venus Bridge. Third from the bottom, the 46-tooth gear drives another 46-tooth gear that is connected to the earth's axis. The 146-tooth shroud must be added above the 46-tooth gear. It doesn't spin, but instead holds a tube that will support a 146-tooth gear between Earth and Mars. Fifth from the bottom, a 32-tooth gear drives a 60-tooth gear that is fixed to Mars on its axle.
Note: gear ratios are proportional to the orbital period of that planet. The Earth's orbital period is 365 days, 1 year. The earth drive gear and the planet gear are 46 teeth. 46/46 = 1. For each rotation of these gears, one earth year has passed into the pattern. Mercury, gears 18 and 74 teeth. 18/74 = 0.24. Mercury revolves around the Sun in 88 days or 0.24 years. Notice also that all tooth combinations add up to 92. This is so they are always the same distance apart.
For Jupiter gears, the rotation must slow down further. This will require two more stacks of gears. Mars gears into a 40-tooth gear that shares a common axle with a 16-tooth gear. That 16-tooth gear drives into a second 40-tooth gear, which is also divided into an axle with a 16-tooth gear. The second 16-tooth gear drives the third 40-tooth gear onto its own axle that sits inside the axle of the first 40-tooth gear. The final 40-tooth gear drives the Jupiter gear.
The final pack of gears at 30-tooth and 15-tooth on a common axle use the rotation of the Jupiter gear to drive the Saturn gear.
Dry fit the vertical supports and add the top plate.
After all gears and plates are assembled. Rotation test by rotating 74-tooth gears with a finger. It should run smoothly and the center axle should rotate at different speeds (except for one girder bridge, it shouldn't spin at all). If you are satisfied with the offer, add a doe or brass tube to the vertical supports and glue to those places.
Step 7: Planets


Show All Products
I decided to use balloons from my local planet store because they came in a variety of colors and sizes and had an abstract quality to them. You could use beads, wooden balls, custom-made plasticine planets, or purchase dummies. The planets must be mounted on brass handles. To enter into brass rods for balls, I used wooden golf tees. I drilled a hole of the same rod diameter straight down onto the tee. I then cut off the bottom of the tee and use super glue to secure the marble to the top of the tee. If you are using a material that can be drilled, you can skip the golf tee and stick the rods right on the planets. I found that it was more likely to crack the marbles by trying to delve into them.
Step 8: Armament Planet


Show All Products
Bend 3/32 inch rods into brackets to hold planets. Bend the eye hooks into the opposite end, which is approximately the diameter of the tubes they are to be attached to.
Make sure the weapons for each planet have a lever long enough that they can pass each other without colliding.
I looked up the relative relative positions of the planets at http://www.theplanetstoday.com/ to find out where to place Saturn, Jupiter and Mars. Do not solder to Earth, Venus and Mercury just yet.
I then soldered the copper eye of the loops onto the matching tubes with a soldering iron. I filed down no extra solder.
Note: Because I used balls, the large glass balls for Jupiter and Saturn were quite heavy and would typically bend 3/32" of the rods. I used those reinforced rods with a sheath of thick brass tubes that prevented strong bending.
Step 9: Moon Mechanism


Show All Products
After installing Jupiter, Saturn, and Mars on their axes. Add in 146 tooth gears to his girder bridge above Mars. Use a few drops of super glue to make sure it doesn't twist.
Note: the moon revolves around the earth every 27.32 days. Here are 13.36 times a year. We can approximate this by having an 11-tooth gear rotate around a 146-tooth gear. 146/11= 13.3.
To make the moon spin around. I drilled two holes in one of the large brass pipes. One fits over an axle that moves on the ground, and the hole at the opposite end of the tube is large enough to allow the moons of the axle to rotate freely. As the earth's axle rotates (due to the gears between the plates), he moves his arm around the outside of the 146-tooth gear. The 146 tooth gear turns an 11 tooth gear which turns the small moon arm. The earth sits on a rod that slides into the lunar bridge. A small washer is added to reduce friction between the hand and the gear.
Step 10: last planets and sun


Show All Products
After the moon, the mechanism runs smoothly. Solder on the Venus and Mercury planetary arms and add the planets to the end of those arms. The sun must be placed in the past, simply mounted on the central rod.
Step 11: Finishing touches and thoughts

Show All Products
I added a rippled clear plastic ring around Saturn to represent its conspicuous rings. I also added some cork shelf liner to the bottom of the base plate to protect any surfaces I put the planetarium on.
I am very pleased with how the model of the solar system turned out. If I ever did more, I would change a few things that you might want to consider.
- I operate the planetarium by moving a 74-tooth gear from my side. Adding a small crank handle could make that a little easier.
- I really like how the balls look, but they are very heavy, especially at the end of long arms. I had to make my base big enough so that if Jupiter and Saturn are on the same side, the device won't tip over. Painting different sized wooden balls can reduce the weight. Owning a house on wheels is not so difficult. The author of this project was able to do without incurring a grandiose cost of money and time […]
- The best way to cut a melon or watermelon (1)
Free machine translation. But I think you can understand everything from the pictures. I accidentally found this melon trick while browsing. (By itself […] - How to make a bag with your own hands. Tape bag. (2)
My wife loves her bags very much. She loves getting new bags. And I reproach her for having too much and not needing more. But she with […]
